piątek, 30 listopada 2012

Domki. Houses.

Oto pomalowane przeze mnie domki. Pochodzą od Pegasusa i doskonale nadają się do 20mm i 28mm.
Here you have painted by me some houses. They are made by Pegasus and are really good for both 20mm and 28mm scale.

środa, 28 listopada 2012

24 Pułk Ułanów - gotowy. 24th Uhlans Regiment - done.

Oto gotowy 24 Pułk Ułanów. W najbliższym czasie będę musiał zakupić dodatkowy zestaw kalkomanii od PSC, ponieważ jeden nie wystarczył na pokrycie wszystkich czołgów... Wciąż muszę dorobić HQ pułku (2x Sherman M4), oraz zdecydowałem się dodać pluton łącznikowy (3x Scout Humber) i wtedy pułk będzie ostatecznie gotowy.
Here is a 24th Uhlan Regiment done. In the near future I will have to buy an extra set of decals from the PSC, because one was not enough to cover all the tanks... I still need to make some extra tanks for regimental HQ (2x M4 Sherman), and I have decided to add a linker platoon (3x Humber Scout) and then the regiment will be finally finished.
Więcej zdjęć:/More pictures:

Obecnie pułk przechodzi intensywne szkolenie, czyli przypominam sobie zasady Battleground PzG i już wkrótce pułk powinien wziąć udział w swojej pierwszej bitwie...
A tymczasem zapraszam do przeczytania pierwszej części mini historii pułku:
Currently the regiment receives intensive training, which means that I re-read the Battleground PZG rules and soon the regiment should take part in its first battle...
In the meantime, I invite you to read the first part of the mini-history of the regiment:

24 Pułk Ułanów im. Hetmana Wielkiego Koronnego Stanisława Żółkiewskiego powstał w czerwcu 1920 roku jako 214 Pułk Ułanów Armii Ochotniczej podczas wojny polsko-bolszewickiej, rozkazem Głównego Inspektoratu Armii Ochotniczej. Pułk był formowany początkowo we Lwowie i Stanisławowie, a następnie w Lesznie k. Warszawy. Pierwsze walki pułk stoczył przeciwko 1. Armii Konnej Semiona Budionnego w rejonie Miączyn – Grabowiec. Po zaciętych walkach w rejonie Zamościa, pułk w składzie 18 Dywizji Piechoty utrzymując zarazem kontakt z Dywizją Konną generała Rómmla wziął udział w pościgu za cofającym się nieprzyjacielem po bitwie warszawskiej. Akcja pod Turzyskiem, za którą Pułk był cytowany w komunikacie Naczelnego Wodza oraz bitwa pod Stepaniem o przeprawy na rzece Horyń, były jednymi z ważniejszych dokonań Pułku. Około 10 października Pułk, w składzie 3. Bryg. Jazdy, przeszedł na pogranicze Litwy w rej. Ejszyszki - Bieniakonie. Stoczywszy dwie kolejne bitwy Pułk zajął Rudniki i Olkienniki. W końcu grudnia Pułk przeszedł na stały postój do Żółkwi, gdzie został przemianowany na 24. Pułk Ułanów armii regularnej.
Sztandar pułku (strona lewa i prawa). Regimantal banner (left and right side). source: http://www.24pu.org
W czasie pokoju pułk stacjonował kolejno w Żółkwi, Dębicy, Staszowie i Jarosławiu a następnie do Kraśnika, wyznaczonego na stałe miejsce postoju. W tym czasie pułk wszedł w skład 17 Brygady Kawalerii. W roku 1922 Pułk otrzymał z rąk Marszałka Józefa Piłsudskiego sztandar, ufundowany przez byłych ochotników 214 Pułku Ułanów Armii Ochotniczej. Święto pułkowe ustalono na dzień 21 września jako rocznicę bitwy pod Stepaniem, zmienione później na dzień 6 lipca - rocznicę dnia formalnego zatwierdzenia Pułku. W roku 1927 zatwierdzony został znak pułkowy. W początkach 1937 r. rozkaz Ministra Spraw Wojskowych nakazał zmotoryzowanie Pułku i wejście w skład 10 Brygady Kawalerii (od 1940 10 Brygady Kawalerii Pancernej) wraz z 10 Pułkiem Strzelców Konnych, w składzie której pozostał już do końca, wpierw w Polsce, potem we Francji i w Wielkiej Brytanii a następnie na polach bitew Francji, Belgii, Holandii i Niemiec.
W roku 1938 Pułk brał czynny udział w zajęciu Zaolzia i Jaworzyny (Javorina). 8 października 1938 roku pułk zajął Bogumin (Bohumín) , zabezpieczając tym przeprawy na Olzie. W listopadzie tego roku pułk brał udział w potyczce z wojskiem czechosłowackim pod Żdżarem (Ždiar). Po zajęciu Zaolzia, Pułk powrócił do Kraśnika.
W połowie marca 1939 r. Pułk został zaalarmowany, przeszedł do rejonu Boguchwała pod Rzeszowem, gdzie pozostał w pogotowiu bojowym do połowy sierpnia. Wybuch wojny zastał Pułk na koncentracji w rejonie Skawina.
W czasie Kampanii Wrześniowej Pułk był w akcji od pierwszych jej dni i stoczył cztery bitwy: obronę w rejonie Wysokiej (2.09.1939), natarcie pod Kasiną Wielką (4.09.1939), walki opóźniające w rejonie Rzeszowa i Łańcuta (8-9.09.1939) i natarcie w rejonie Hołosko – Grzybowice – Zboiska pod Lwowem (15-17.09.1939). 19 kwietnia na rozkaz Szefa Sztabu Głównego Pułk przekroczył granicę polsko-węgierską na Przełączy Tatarskiej i został tam internowany.
Ponowne odtwarzanie pułku nastąpiło we Francji, początkowo w obozie Coetquidan, a następnie w Paimpont, potem Bollene i w końcu w Mondragon. 29.05.1940 Pułk został przesunięty w rejon Arpajon pod Paryżem. 2. szwadron wziął udział w walkach osłonowych francuskiego 7. Korpusu. Po walkach pod Montbart i opóźnianiu na Dijon grupa otoczona przez nieprzyjaciela nie mając benzyny i amunicji, będąc pod ciągłym bombardowaniem lotniczym, na rozkaz D-cy Bryg. zniszczyła sprzęt i małymi oddziałami przedzierała się na południe. Wiele z nich przez Hiszpanię lub Afrykę północną i Gibraltar dołączyło do oddziałów w Wielkiej Brytanii. W tym czasie pozostała część pułku przybyła w rejon St. Varren, gdzie otrzymała rozkaz przejść na południe i starać się ewakuować do Wielkiej Brytanii z portu Le Verdon. 21.06.1940 Pułk z całą bronią i amunicją, pozostawiając tylko sprzęt motorowy załadował się na ostatni okręt opuszczający brzegi zachodniej Francji — „Royal Scotsman" i odpłynął do Wielkiej Brytanii.
25.06.1940 HMS „Royal Scotsman” mający na pokładzie 24 Pułk Ułanów wpłynął do West Docks portu Liverpool. Pułk został przerzucony do Szkocji gdzie stacjonował w Glasgow a następnie w rejonie Douglas i Biggar. Od 26.07.1940 roku ochrania lotnisko w Johnstone, a od 18.10.1940 uczestniczy w ochronie wybrzeża szkockiego przed inwazjom niemiecką. Od września 1941 Pułk szkoli się na sprzęcie czołgowym i przeorganizowuje się na pułk pancerny. 11.04.1941 pułk przechodzi do Calashiels i Lauder. 6.06.1943 na poligonie w rejonie Chippenham odbywa po raz pierwszy próby jako pułk pancerny. Po tym pułk ponownie powraca do Szkocji. Od końca września Pułk zaczął otrzymywać czołgi typu Sherman i Stuart. Od 19.03.1944 Pułk rozpoczął mobilizację, do 18.04.1944 wymieniono cały sprzęt szkoleniowy na bojowy. 23.05.1944Pułk przeszedł do Bridlington w celu ostatecznego przygotowania się do akcji. Pogotowie i przejście w dniu 16.07.1944 do rejonu wyczekiwania Aldershot zakończyło długi okres przygotowania Pułku do wzięcia udziału w ostatecznej rozgrywce z Niemcami. 29.07.1944 Pułk załadowano na statki w Londynie i 30.07.1944 opuścił ujście Tamizy kierując się ku brzegom Francji, na pole bitwy w Normandii.
Cdn...
The 24th Uhlan Regiment of the Great Crown Hetman Stanisław Żółkiewski was established in June 1920 by order of the Chief Inspectorate of the Volunteer Army as the 214th Uhlan Regiment of the Volunteer Army during the Polish-Bolshevik war. The regiment was formed initially in Lvov and Stanislav, and then in Leszno near Warsaw. The first battle the regiment fought against the 1st Cavalry Army of Semion Budyonny in the area Miaczyn - Grabowiec. After heavy fighting in the area of ​​Zamosc, a regiment as the part of 18th Infantry Division also maintained contact with the Cavalry Division of General Rómmel took part in the pursuit of the retreating enemy, after Battle of Warsaw. Action at Turzysk, for which regiment was quoted in the release of Supreme Commander and Battle of Stepanie over the crossing of the river Horyn, were among the most important achievements of the regiment. Around 10th October, regiment as the part of the 3rd Cavalry Brigade took the posiotions on the Polish-Lithuania border in the area of Ejszyszki – Bieniakonie. Fought two more battles, regiment took Rudniki and Olkienniki. At the end of December regiment has been sent to Zhovkva, where was renamed for the 24th Cavalry Regiment of the regular army.
 
In midwars times, the regiment was stationed first in Zhovkva, then in Debica, Jaroslaw, Staszow and then in Kraśnik, appointed on a permanent basis based. At that time the regiment became the part of the 17th Cavalry Brigade. In 1922 the regiment received their banner from Marshal Jozef Pilsudski, donated by the former volunteers of the 214th Uhlan Regiment of the Volunteer Army. Regimental day was set for 21th September as the anniversary of the Battle of Stepanie, changed later on 6th July - the anniversary of the formal approval of the regiment. In 1927, was approved regimental sign. At the beginning of 1937, by the order of the Minister of Defence, regiment has been motorized and took part together with 10th Polish Mounted Rifle Regiment in the 10th Cavalry Brigade (from 1940 10th Armoured Cavalry Brigade), remained as the part of it until the end of the war, first in Poland then in France then in Britain and then on battlefields of France, Belgium, Holland and Germany.
In 1938, the regiment took part in the annextion of Zaolzie and Javorina. 08.11.1938 the regiment took Bohumin, protecting the crossing on Olza river. In November this year, the regiment took part in a skirmish with the Czechoslovak army at Zdiar. After annextion of Zaolzie, regiment returned to Krasnik.
In the middle of March of 1939, the regiment was alerted, and moved to the area of Boguchwala near Rzeszow, where remained in a combat ready until middle of the August. The outbreak of of the war found regiment in the region of Skawina.
During the Polish Campaign the regiment was in action from the first dayof wa and fought four battles: the defense of the region of Wysokie (02.09.1939), assault in the Kasina Wielka (04.09.1939), delay fighting in the region fo Rzeszw and Lancut (8-9.09.1939 ) and assault in the area Holosko - Grzybowice - Zboiska near Lvov (15-17.09.1939). 19th April by the orders of the Chief of the General Staff the regiment crossed the Polish-Hungarian on Tatar Pass and was interned there.
Replay of the regiment took place in France, initially in the camp Coetquidan, then Paimpont, then Bollene and finally in Mondragon. 29.05.1940 the regiment was moved to the area of Arpajon near Paris. Second squadron took part in the battles of shielding the French 7th Corps. After the battles of Montbart and delaying fightings at Dijon, group surrounded by the enemy, with no petrol and ammunition, being under constant bombardment by air, destroyed their equipment and with small groups struggled south. Many of them by Spain and North Africa and Gibraltar joined the troops in the UK. At this time the remainder of the regiment arrived in the region of St. Varren where was ordered to move south and try to escape to the UK from the port of Le Verdon. 21.06.1940 the regiment with all the weapons and ammunition, leaving only the motor equipment, loaded on the last ship leaving the western shores of France - the HMS Royal Scotsman and sailed to the UK.
25.06.1940 HMS Royal Scotsman having on board 24 Uhlan Regiment reached the West Docks in Liverpool. The regiment was moved to Scotland, where was stationed in Glasgow and then in the area of ​​Douglas and Biggar. From 26.07.1940 was protecting the airfield in Johnstone and from 18.10.1940 participates in the protection of the East Coast of Scotland against German invasion. From September 1941 the regiment was trained with tank equipment and reorganizes to the armored regiment. 04.11.1941 regiment goes to Calashiels and Lauder. 06.06.1943 on the proving ground in the area of ​​Chippenham held the first test as an armored regiment. After that regiment again returned to Scotland. From the end of September the regiment began to receive Sherman and Stuart tanks. From 19.03.1944 the regiment began mobilizing and till 18.04.1944 replaced all training equipment for combat one. 23.05.1944 24th moved to Bridlington to prepare for final action.
On 16.07.1944 moved to the waiting area in Aldershot ended a long period of preparation of the regiment to take part in a subjugation of Germany. 29.07.1944 the regiment was loaded on ships in London and left Thames Estuary on 30.07.1944 heading for the shores of France, on the battlefield of Normandy.
To be continued ...

 
Bibliografia:/Sources:

  1. Historia 24 Pułku Ułanów na stronie Koła Koleżeńskiego 24 Pułku Ułanów autorstwa Andrzeja Ruska:http://www.24pu.org/index.php?option=com_content&task=view&id=42&Itemid=32
  2. Janusz Ledwoch: „1 Dywizja Pancerna 1939-1944”, Wydawnictwo Militaria,Warszawa 1996.
  3. Kacper Śledziński: „Czarna Kawaleria. Bojowy szlak pancernych Maczka”, Wydawnictwo Znak, Kraków 2011.
  4. Zbigniew Lalak: „Broń Pancerna w PSZ 1939 – 1945. Organizacja i struktura.”, Pegaz-Bis &O.K. Media, Warszawa 2005.

sobota, 24 listopada 2012

Villa in Pyrenees. Wioska w Pirenejach.

This week we decided to re-play a scenario prepared by Donald Adamson (the relation from the earlier game you can read here (click here)). We used to play Black Powder rules, figures from the collection of Donald Adamson and terrains from the Hugh Wilson's collection. Kevin Gunn commanded the French forces defending the village, while I played the character of Captaine Gerard (omnipresent figure in the Donald's Napoleonic scenarios). British Forces ware commanded by Colin Jack and Campbell Hardie. Hugh created this time the audience of this show. I would like to thank Suzanne Wilson for the delicious meal before the game.
W tym tygodniu postanowiliśmy ponownie rozegrać scenariusz przygotowany przez Donalda Adamsona (relację z wcześniejszego rozegrania gry możecie przeczytać tutaj (kliknij tu). Do gry użyliśmy zasad Black Powder, figurek z kolekcji Donalda Adamsona i terenów z kolekcji Hugh'a Wilsona. Francuskimi siłami broniącymi wioski dowodził Kevin Gunn, ja natomiast wcieliłem się w postać Kapitana Gerarda (postać wszechobecna w napoleońskich scenariuszach Donalda). Siłami brytyjskimi dowodzili Colin Jack i Campbell Hardie. Hugh tym razem tworzył widownię tego widowiska. Bardzo dziękuję Suzanne Wilson za przepyszny poczęstunek.
The battlefield. Pole bitwy.

Going back to the game. British unobserved came very close to the position of the French, who just had a nap. The three British battalions strengthened with three guns began the siege of the village. Surprised French very quickly mastered the confusion and bravely stood up to fight against the overwhelming British forces. At the same time, Captain Gerard start his long way to bring the reinforcements. Meanwhile, the fight of the French defensive positions became more and more intense. To make things worse for the French shortly on the other side of the valley new British forces appeared and started storming the the walls surrounding the village. The first charge was repelled and one of the British battalions destroyed, but the advantage of attackers became more and more apparent. Meanwhile, Captain Gerard was not in hurry and slowly riding west... The situation in the village became not good for the French, who ware under pressure from the British and had to step back and let the attackers go between buildings. French also began to bend under the pressure of the attackers and British victory seemed be only a matter of time, while Captain Gerard slowly riding in the direction of the French forces... Meanwhile, in the village, the British broke the French defenses and slowly began to eliminate defenders. Captain Gerard finally reached the French forces and, together with three new infantry battalions, cavalry squadron and three guns began to march towards the besieged village, but continues to do it in a very slow manner. The British, who have managed to eliminate two French battalions were still not able to control the village. Their cavalry, wisely left in reserve, was suddenly attacked by French cavalry. The British were forced back and in counter charge they destroyed French cavalry. It seemed that the French will lose this battle, but in this moment the game to speed up for me (most of the game I remained as the passive observer, due to the slow Captain Gerard movement). Before that, something unexpected happened. Colin for activation of his guns threw double ones, which caused blunder. As a result of that was a charge towards the nearest enemy. Of course, artillery charging the strengthen village looked ridiculous, but it became the source of numerous comments after the game. At that time British forces had closed the encirclement and tried to eliminate the last battalion of French in the village, when suddenly they were attacked from behind by the French reinforcements under my command. Fresh forces quickly destroyed some of the besieging British, defended the village and forced British to retreat. The fight ended with a decisive victory of the French.
Wracając do gry. Brytyjczycy niezauważeni podeszli bardzo blisko do pozycji francuskich, którzy oddawali się drzemce. Trzy brytyjskie bataliony wzmocnione baterią trzech dział rozpoczęły oblężenie wsi. Zaskoczeni Francuzi bardzo szybko opanowali zamieszanie i dzielnie stanęli do walki z przeważającymi siłami brytyjskimi. W tym też czasie Kapitan Gerard wyruszył w swoja długą drogę w celu ściągnięcia posiłków. Tymczasem walka o francuskie pozycje obronne była coraz bardziej zażarta. Na domiar złego dla Francuzów wkrótce po drugiej stronie doliny pojawiły się nowe siły brytyjskie i rozpoczęły szturm murów okalających wioskę. Pierwsza szarża została odparta i jeden z brytyjskich batalionów zniszczony, ale przewaga atakujących stawała się coraz bardziej widoczna. A tymczasem Kapitan Gerard, nie spiesząc się zanadto jechał po posiłki... Sytuacja w wiosce stawała się powoli niedobra dla Francuzów, którzy pod naporem Brytyjczyków musieli cofnąć się i pozwolić atakującym wejść pomiędzy zabudowania. Francuzi zaczęli tez uginać się pod naporem atakujących i zwycięstwo brytyjskie zdawało się już tylko kwestią czasu, gdy tymczasem Kapitan Gerard spokojnie podróżował sobie w kierunku sił francuskich... Tymczasem we wiosce Brytyjczycy przełamali linie obronne Francuzów i powoli rozpoczęli eliminowanie obrońców. Kapitan Gerard w końcu dotarł do sił francuskich i wraz z trzema nowymi batalionami piechoty, trzema działami i szwadronem kawalerii rozpoczął marsz w kierunku oblężonej wioski, jednak dalej wykonywał to w bardzo powolnym tempie. Brytyjczycy, którzy zdążyli wyeliminować już dwa francuskie bataliony, dalej nie byli w stanie opanować wioski. Ich kawaleria przezornie zostawiona w odwodzie została nagle zaatakowana przez kawalerię francuską. Brytyjczycy zostali zmuszeni do wycofania się i w kontr szarży zniszczyli francuską kawalerię. Wydawało się że Francuzi bitwę tą przegrają, jednak w tym momencie gra dla mnie przybrała przyspieszenia (przez większość gry pozostawałem jej biernym obserwatorem, ze względu na powolnego Kapitana Gerarda). Zanim jednak to się stało wydarzyło się coś niespodziewanego. Colin na aktywację swoich armat wyrzucił dublet jedynek, co powoduje tzw „blunder” w jej wyniku został zmuszony do wykonania nieoczekiwanej szarży w kierunku najbliższego przeciwnika. Oczywiście szarża artylerii na umocnienia wioski wyglądał komicznie, ale stała się ona źródłem licznych komentarzy już po samej grze. W tym właśnie czasie siły brytyjskie zamknęły pierścień okrążenia i próbowały wyeliminować ostatni batalion francuski w wiosce, gdy nagle od tyłu zostali zaatakowani przez francuskie posiłki pod moim dowództwem. Świerze siły szybko rozprawiły się z oblegającymi Brytyjczykami i obroniły wioskę oraz zmusiły Brytyjczyków do odwrotu. Walka zakończyła się zdecydowanym zwycięstwem francuskim.
British atacking the village. Brytyjczycy szturmują wioskę.
The charge of the cannons. Szarża artylerii.
Decisive French attack. Decydujący atak francuski.

For more pictures from the game, visit my flickr:
Po więcej zdjęć z gry, zapraszam na mojego flickr'a:


wtorek, 20 listopada 2012

24 Pułk Ułanów; 24th Uhlans Regiment - WIP

Prace nad 24 Pułkiem Ułanów trwają. Czołgi otrzymały już bazowe kolory. Reszta prac w ten weekend i jak wszystko pójdzie zgodnie z planem trzon pułku będzie gotowy do prezentacji w niedzielę wieczorem.
Works on 24th Uhlans Regiment are in progress. Tanks have already received basic colors. The rest of the work this weekend and if all goes according to the plan, the core of the regiment will be ready for presentation on Sunday evening.

Obecny stan pułku:
The current look of the regiment:

sobota, 17 listopada 2012

Battle of ford on river X. Bitwa o bród na rzece X

Last Thursday in SESWC we decided to refresh the Triumph And Tragedy rules. For this purpose Colin Jack prepared a scenario placed during the Russo-Japanese War. All figures and most of the terrains comes from the Colin's collection. Bill Gilchrist led the Japanese, while I was commanding the Russians. I chose it therefore that during this war, many Poles served in the Russian army, including many officers who later on became generals of Second Polish Republic army.
W zeszły czwartek w SESWC postanowiliśmy odświeżyć sobie zasady Triumph And Tragedy. W tym celu Colin Jack przygotował scenariusz rozgrywający się podczas wojny rosyjsko-japońskiej. Wszystkie figurki, jak i większość terenów pochodzą z kolekcji Colina. Japończykami dowodził Bill Gilchrist, ja natomiast dowodziłem Rosjanami. Wybrałem to z tego powodu, że w tej wojnie w armii rosyjskiej służyło wielu Polaków, w tym wielu późniejszych generałów armii Drugiej Rzeczypospolitej
The battlefield. Pole bitwy.
Usually scenarios prepared by Colin contain a some surprices for players and so it was this time. Both of us, Bill and I, had to divide our forces into three parts, on troops on tables A, B and C. When we did that, we learned that the battle will be fought on the table C, and troops from other tables will be arriving during next turns, 1-6 for units from table B and 7-12 for units from table A. Luckily for me on that table I had the most numerous units, but also the weakest in terms of level of experience. My task was to stop the march of the Japanese and prevent them from crossing the river. Detailed army lists and operational plans, can be found on the Bill's blog. (click here)
Scenariusze przygotowywane przez Colina zazwyczaj zawierają w sobie pewną niespodziankę dla graczy i tak było w tym przypadku. Oboje z Bill'em musieliśmy podzielić nasze siły na trzy części, na siły znajdujące się na stołach A, B i C. Gdy tego dokonaliśmy dowiedzieliśmy się, że walka będzie toczona na stole C, a oddziały z innych stołów będą nadchodziły w ciągu następnych tur, 1-6 dla stołu B i 7-12 dla stołu A. Na moje szczęście na stole C miałem najliczniejsze oddziały, ale jednocześnie najsłabsze jeżeli chodzi o poziom doświadczenia. Moim zadaniem było zatrzymanie pochodu Japończyków i uniemożliwienie im przeprawy przez rzekę. Szczegółowe rozpiski armii i plany operacyjne, znajdziecie na blogu Bill'a. (kliknij tutaj)

The fight started with my fast move towards the river and the village, to take most suitable defensive positions. Being aware of the shortcomings of my troops, I had to use my numerical superiority, and as soon as possible to eliminate the as much as possible Japanese units. For this purpose I decided to create one from all available to me units, a great line of infantry, which with fire of their rifles would be block the ford, whilst the cavalry will be eliminate any Japanese survivirs in melees. Artillery was supposed to support all my units. Japanese as the first, used their Chinese mercenaries. The first of them attacked from the flank on my Cossack but it failed and thus Japanese lost their first unit. Then the Japanese infantry began gaining the ford, but there came under fire of the Russian infantry. Japanese losses were growing, while the Russians took better positions to the defense. Arrived Japanese artillery unlimbered very quickly and began to shoot an effective fire on the approaching Russian reinforcements, effectively disturbing my plan on my right flank. Meanwhile, the Russian unit defending the ford incur severe losses, and when it seemed that it will be lost soon, he the second unit of Chinese mercenaries attacked them and once again the Russians were victorious. At that time, the Japanese cross the river with the whole infantry unit, while the Russians finished the preparation for the defense. Due to the time, we had to finish our game, which at this point remains unresolved...
Walka rozpoczęła się od mojego szybkiego ruchu w kierunku rzeki i leżącej nad nią wsi, by zająć jak najdogodniejsze pozycje obronne. Mając świadomość niedostatków moich oddziałów, musiałem wykorzystać moją przewagę liczebną i w jak najkrótszym czasie eliminować jednostki japońskie. W tym celu postanowiłem utworzyć jedna wielką linię z całej dostępnej mi piechoty, która ogniem swoich strzelb blokowała by bród, a kawaleria miała stanowić siłę przełamującą i w walce wręcz miała eliminować niedobitki. Artyleria miała za zadanie wspierania ogniem, zagrożonych przełamaniem jednostek. Japończycy jako pierwsze do walki rzucili oddziały najemników chińskich. Atak z flanki pierwszego z nich na moich Kozaków, zakończył się niepowodzeniem i w ten sposób Japończycy stracili pierwszy oddział. Następnie japońska piechota rozpoczęła zdobywanie brodu, jednak tu dostała się pod celny ogień rosyjskiej piechoty. Straty japońskie rosły, natomiast Rosjanie zajmowali dogodne pozycje do obrony. Przybyła artyleria japońska, szybko się rozstawiła i rozpoczęła skuteczny ogień w kierunku nadciągających rosyjskich posiłków, skutecznie przeszkadzając mi w wykonaniu mojego planu na mojej prawej flance. Tymczasem rosyjski oddział broniący brodu ponosił coraz dotkliwsze straty i gdy wydawało się, ze już niedługo zostanie zniesiony, zaatakował go drugi oddział najemników chińskich i znów górą byli Rosjanie. W tym właśnie czasie Japończykom udało się w całości przeprawić oddział piechoty, natomiast Rosjanie kończyli przygotowywanie linii obrony. Ze względu na czas, musieliśmy zakończyć naszą grę, która w tym momencie pozostawała nierozstrzygnięta...
Japanese ready to cross the river. Japończycy gotowi by przekroczyć rzekę.

Russian positions. Pozycje rosyjskie.

First charge of the day. Pierwsza szarża dnia.

Second charge of the day. Druga szarża dnia.

Positions at the end of the game. Pozycje na zakończenie gry.
 
Next probably will be the Very British Civil War.
Następna prawdopodobnie będzie Brytyjska Wojna Domowa. 
More pictures on my flickr:
Więcej zdjęć znajdziecie na moim flickr:


niedziela, 11 listopada 2012

Wszystkiego najlepszego w Dniu Niepodległości. Happy Independence Day!


'Watch This Space' - update; aktualizacja.

I've just received mail from Colin about the game we tested on thursday and I decided to share it with you.
The game seemed to play much better on the day than it did in the test, not sure why as I really made very few changes.  Everyone seemed to like it and indeed it took first prize in the Participation section.  Bill and I probably ran about eight games with very different results.  The guy that wrote the rules was there and I had a long chat with him - he seemed to like what we were doing with them and offered support if we wanted to do it again. 
I just wanna said, that the game as the table (I just wish that I did not saw the final view of the table) was prepared with the highest level, and you trully deserved the prize. Well done guys!!!

Właśnie otrzymałem maila od Colina dotyczący gry, którą testowaliśmy w czwartek i postanowiłem się z Wami podzielić jego treścią.
Gra rozgrywana była znacznie płynniej niż wtedy podczas testów, nie jestem pewien czemu dokonałem tych kilku zmian. Wszyscy wyglądali, że gra im się podobała i w sumie zajęła pierwsze miejsce wśród gier, w których widzowie mogli wziąć udział. Bill i ja poprowadziliśmy około ośmiu gier z bardzo różnymi rezultatami. Człowiek, który napisał te zasady był tam i długo z nim rozmawiałem o tym - wydawał się, że bardzo mu się podoba mu się to co zrobiliśmy z jego przepisami i zaoferował pomoc, jeśli byśmy chcieli zrobić to znowu.
Chcę tylko dodać, że zarówno gra jak i stół (szkoda, że nie widziałem jego finalnego wyglądu) były przygotowane z zachowaniem najwyższych standardów i szczerze zasłużyliście na nagrodę. Bardzo dobra robota!!!

The game report you can find here:
Raport z gry możecie przeczytac tutaj:

sobota, 10 listopada 2012

Testing the 'Watch This Space' game. Testując grę "Watch This Space"

In this Thursday, I was invited by Hugh'a Wilson and Colin Jack for testing their game, which they going to present at Saturday's Targe 2012, wargamingowym show held in Kirriemuir and organized by the local club. Bill Gilchrist and Dave O'Brien were also invited for the tests.
Tested game is a game in an alternate reality in which the United Kingdom and her Commonwealth plays a major role in the conquest of space. This subject was very popular in comics of the 1950's and 1960's in the United Kingdom. We used to play Crooked Dices 7TV rules.
Our game takes place above and below a certain airport in Canada, which is only superficially looked normal. In the basement was a laboratory, the purpose of the attack of various evil scums from the Earth (Soviets, the Americans [they are trying to steal the technology from Brits], etc.), and also from the space. The game is to defend or to atack the base. The game will be the partipation game for visitors. Our tests have to answer whether everything is in the best order.
In the first game Soviets (Bill) ware attacking the base defended by the ordinary Security team (myself). In this game appear my bad luck in games of this kind, and my throws were very low. It is no wonder that Bill beat me very quickly. In the second game, evil Aliens (Hugh) attacked laboratories defended by British soldiers (Dave). This game was a draw, as both sides killed each other. In the third game, evil space robots (myself) stood in front of commandos (Bill) and as previously I have suffered an ignominious defeat. These three games have given us a number of answers to this as the game is supposed to look at the show.
When we finished our tests it came time to play for fun. Soviet soldiers (Bill and I) attacked a base defended by the Brits (Hugh and Colin). In this game, purely military, my throws were already much better and we managed to win.
I hope that this game will be a success on the Targe 2012.
In what I personally believe.

W ten czwartek zostałem zaproszony przez Hugh'a Wilson'a i Colin'a Jack'a do przetestowania ich gry, którą mieli zamiar przedstawić na sobotnim Targe 2012, wargamingowym show odbywającym się w Kirriemuir a organizowaną przez tamtejszy klub. Do testów zaproszeni zostali również Bill Gilchrist oraz Dave O'Brian.
Testowana gra jest grą w rzeczywistości alternatywnej w której to Zjednoczone Królestwo i jej Wspólnota gra główną role w podboju kosmosu. Tematyka ta była bardzo popularna w wydawnictwach komiksowych lat 50-tych i 60-tych XX wieku w Wielkiej Brytanii. Do gry użyliśmy zasad Crooked Dices 7TV.
Nasza gra odbywała się nad i pod pewnym lotniskiem w Kanadzie, które tylko z pozoru wyglądało na normalne. W jego podziemiach znajdowało się laboratorium, cel ataku różnych złych szumowin z Ziemi (Sowieci, Amerykanie [próbują wykraść technologie Brytyjczykom] itp.), jak tez i z kosmosu. Gra polega na albo obronie bazy, albo też na jej ataku. Gra będzie dostępna dla odwiedzających, którzy mogą w niej spróbować swych sił. Nasz test miał dać odpowiedź, czy wszystko przebiega w najlepszym porządku.
Pierwsza gra to atak Sowietów (Bill) na bazę broniona przez zwykłą ochronę (ja). W tej grze dało znać mój pech w grach tego typu i moje rzuty były bardzo niskie. Nic więc dziwnego, ze Bill pokonał mnie bardzo szybko. W drugiej grze źli kosmici (Hugh) zaatakowali laboratoria bronione przez brytyjskich żołnierzy (Dave). Ta gra została nierozstrzygnięta, ponieważ obie strony powybijały się nawzajem. W trzeciej grze złe kosmiczne roboty (ja) stanęły naprzeciwko komandosów (Bill) i tak jak poprzednio doznałem sromotnej porażki. Te trzy dały nam szereg odpowiedzi na to jak gra ma wyglądać na pokazie.
Gdy zakończyliśmy nasze testy przyszedł czas na grę dla rozrywki. Sowieccy żołnierze (Bill i ja) atakowaliśmy bazę bronioną przez Brytyjczyków (Hugh i Colin). W tej grze, już czysto militarnej moje rzuty były już zdecydowanie lepsze i udało nam się wygrać.
Mam nadzieje, że ta gra będzie się cieszyć powodzeniem na Targe 2012. W co osobiście bardzo wierzę.
Somewhere in Canada is ordinary airfield... Gdzieś w Kanadzie jest zwykłe lotnisko...
... Under it surface is an hidden laboratory... ... Pod którym jest ukryte laboratorium...
... An attack objective for various scum... ...Obiekt ataku dla różnych szumowin...
... Like those Soviets, for example. ... Jak tych Sowietów, na przykład.
Part of the Colin's very impresive collection. Część imponujacej kolekcji samochodów Colin'a.


środa, 7 listopada 2012

The gangster's day. Dzień gangstera.

Last saturday I took part in the big Gangster day at Hugh. The idea of that day was that, during the year, everybody had their birthday, but in different parts of the year. Becouse most of our gamers ware born in October, we decided to organize the huge game as the birthday game for all. Besides of the games, there was of course an excellent theme meal, prepared by Susanne Wilson and of course a birthday cake. There was a gift, but one only, I we diced for it. The winner of that game was Olivier and now, I'm sure, he enjoyed with his 'Sopranos'.
W ostatnią sobotę wziąłem udział w wielkim Dniu Gangsterskim organizowanego u Hugh'a. Ideą  przewodnią tego dnia było to, że każdy ma tam kiedyś w ciągu roku swoje urodziny, ale kazdy w innym czasie. Ze względu na to, że większość naszych graczy ma swoje urodziny w październiku, postanowiliśmy urządzić wielką urodzinową grę dla każdego. Oprócz gier był oczywiście wspaniały posiłek tematyczny przygotowany przez Susanne Wilson i oczywiście urodzinowe ciasto. Był również prezent, ale tylko jeden i wszyscy graliśmy o niego. Zwycięzca tej gry okazał się Olivier i teraz zapewne cieszy się ze swoich "Rodziny Soprano".
The cake. Ciasto. Photo by Bill Gilchrist

But back to the games. All the scenarios was prepared by Colin Jack. There ware gangsters wars put back in 1920s in America. We used the Legends of the West rules with an idea from the Wargames, Soldiers & Strategy.  Colin and Hugh Wilson prepared one hudge table for games,  which was divided  on four parts, where the games take place. There was ten players, 6 played as the single and two 2 men teams. About the results I tall you later, but here are the games. A will show you them as I was played them.
Wracając do gier. Wszystkie scenariusze zostały przygotowane przez Colina Jack'a. Była to gra o wojnach gangsterskich w latach dwudziestych XX wieku w Ameryce. Użyliśmy zasad Legends of the West z pomysłami z magazynu Wargames, Soldiers & Strategy. Colin i Hugh Wilson przygotowali również stół do gry, który został podzielony na cztery częsci, gdzie były rozgrywane gry. Było razem dziesięciu graczy: sześciu grało indywidualnie oraz czterech w dwu osobowych zespołach. O rezultatach tych gier opowiem później, a teraz o grach. Zachowam tutaj porządek rozgrywanych przeze mnie gier.
I played the Policemen.
Grałem Policjantami.
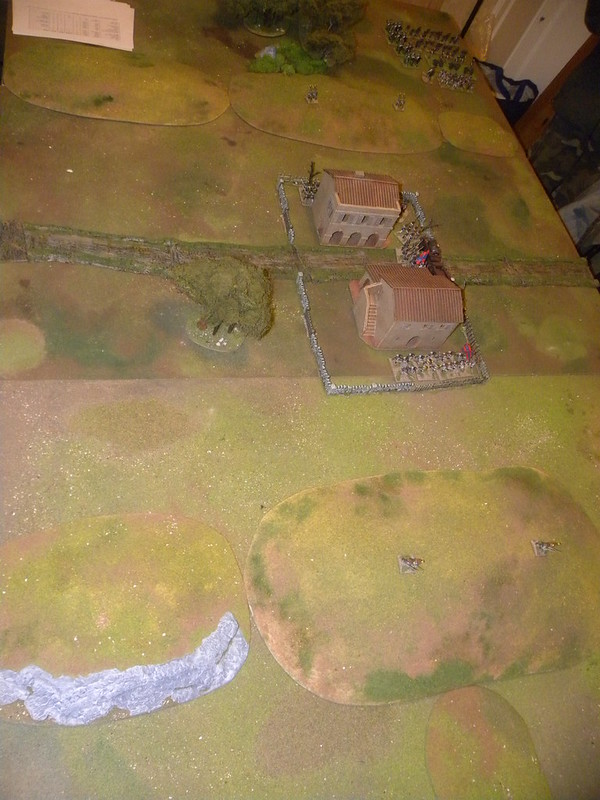
Half of the table. Połowa stołu.

GAME No 1: 
GRA Nr 1:

DOCKLANDS - AMBUSH
Starting positions: Defender deploys on the edge, atacker split force beetween two opposite edges.
The drop: Atacker goes first.
Winning: Defender wins if he gets more than half his figures off opposite end of table. Atacker wins if he takes out more than half of the defenders gang. Game ends when one side bottles out or wiped out.
Experience: one point for each gangster who survives, one point for leader of winning gang and one point for every enemy taken out of action.

Attacker: myself.
Deffender: Dave O'Brian
This game was the game when I was actually get familiar with the rules. I never played this game before. There is no suprise that Dave wiped my gang very quickly and he won this game.
Atakujący: ja.
Obrońca: Dave O'Brian.
Ta gra była moja pierwszą grą w której tak naprawdę poznawałem zasady gry. Nigdy wcześniej w nią nie grałem wcześniej. Nie było więc zaskoczenia, że Dave wykosił mi mój gang bardzo szybko i to on wygrał tą grę.

GAME No 2:
GRA Nr 2:

SHANTY TOWN - DAWN RAID
Starting positions: Defender sets up in Centre. Attacker sets up on one edge. Attacker and Defender each place one Sentry. Attacker and Defender take turns to place six (actually five in my game...) Moonshine stashes.
The drop: Attacker goes first.
Winning: Attacker wins if he can get all the Moonshine off the table. Game ends when one side bottles out or wiped out.
Experience: one point for each gangster who survives, one point for leader of winning gang and one point for every enemy taken out of action.
Special: Defenders are asleep on first turn. Sentries moved by whoever has the Drop. Daybreak arrives on d6 roll starting on turn 2. Needs 6 but one better each turn. Sentry needs 4+ to spot figures within 12'' in the dark, 24'' in the daylight. Automatic if in the open. Any shooting will wake deffenders.

Attacker: myself.
Deffenders: Ian Carter& Jim
This was the most interesning scenario, becouse besides of the killing the opponent, you have to do something else. The daylight comes very quickly and the shooting starts. None of us get their tasks. becouse of the time for the lunch and the game was a drow.
Atakujący: ja.
Obrońcy: Ian Carter i Jim
To był najbardziej interesujący scenariusz, ponieważ oprócz zwykłego wybijania przeciwnika, trzeba było zrobić coś innego. Dzień w naszej grze przyszedł bardzo szybko i strzelanina się rozpoczęła. Żadnemu z nas nie udało sie osiągnąć swoich zamierzeń, a to ze względu na porę lunchu i gra zakończyła się remisem.

GAME No 3:
GRA Nr 3:

AIRPORT - VENDETTA
Starting positions: Defender starts next to the aircraft. Attacker splits gang and starts each within 6'' of corner.
The drop: Attacker goes first.
Winning: Game ends when one side bottles out or wiped out.
Experience: one point for each gangster who survives, one point for leader of winning gang and one point for every enemy taken out of action.

Attacker: myself (once again!)
Deffender: Dave Paterson
I'm not very happy with this scenario. My forces was in open against the opponent in cover, so I lost my troops very quickly. Another lost game...
Atakujący: ja (po raz kolejny!)
Obrońca: Dave Paterson
Nie byłem bardzo zadowolony z tego scenariusza. Moje siły znalazły sie w otwartym terenie, naprzeciwko sił ostrzeliwujących mnie z ukrycia, tak więc bardzo szybko straciłem swoich ludzi. Następna przegrana gra...

GAME No 4:
GRA Nr 4:

CITY CENTRE - HIGH NOON
Starting positions: Both sides at opposite ends of table.
The drop: dice for who goes first.
Winning: Game ends when one side bottles out or wiped out.
Experience: one point for each gangster who survives, one point for leader of winning gang and one point for every enemy taken out of action.  

Player 1: Donald Anderson.
Player 2: myself.
After three games the worst scores had Donald nad myself. So this was the game for 7th place. This game becouse of the lots of buildings and any possible covers, was very good. This was the game, when I finally get the point. But this time my dices was very low, and the result was another lost game. So finally I took the 8th place, the last one...
Gracz 1: Donald Anderson
Gracz 2: ja.
Po trzech grach osobami z najgorszymi wynikami byli Donald i ja. Tak więc ta gra była w rzeczywistości rozgrywką o miejsce siódme. Ze względu na masę budynków i dużej ilości potencjalnych osłon była bardzo ciekawa. Właściwie to dopiero w tej grze zrozumiałem jej sedno. Tym razem zawiodły mnie jednak kości i w rezultacie była to kolejna przegrana gra. Tak więc ostatecznie zająłem pozycję ósmą, ostatnią...

The final was beetween Bill Gilchrist and Dave O'Brian. The game was finished with the drow, and lucky throw was needed. Dave get more than Bill, and he becomes the winner. I as the worst player get something as well, the wooden spoon trophy. It was very good day, full of fun, as the birthday should be.
Finał został rozegrany pomiędzy Bill'em Gilchrist'em i Dave O'Brian'em. Gra zakończyła sie remisem i potrzebny był szczęśliwy rzut. Dave wyrzucił więcej niz Bill i to on został zwycięzcą. Ja jako najgorszy zawodnik, również coś otrzymałem, drewnianą łyżkę jako trofeum. to był bardzo dobry dzień, pełen zabawy, tak jak dzień urodzin powinien być.
Hugh together with Dave, the winner. Hugh razem z Deve'm, zwycięzcą. Photo by Colin Jack
Hugh, myself and the wooden spoon. Hugh, ja i drewniana łyżka. Photo by Colin Jack.
This the final list of the tournament (if Im wrong please let me know about it):
Oto ostateczna lista turnieju:

1. Dave O'Brian
2. Bill Gilchrist
3. Colin Jack & Hugh Wilson
4. Dave Paterson
5. Ian Carter & Jim
6. Olivier Lepreux
7. Donald Anderson
8. Bartosz Żynda

There is also relation on Bill's blog.
Na blogu Bill'a znajdziecie również relację z tych gier.

sobota, 3 listopada 2012

Sudan.

You may remember one of my previous posts, about a Death in the Dark Continent set of rules, if not here you have a link to a previous relation. During our thursday meeting at the club, we decided to refresh these rules. The game was organised by Colin Jack, who umpired it and has provided all necesary elements: figures and terrains etc. In this battle the Egyptians ware commanded by Bill Gilchrist and Angus Konstam, whilst the Mahdists ware led by Donald Adamson, Campbell Hardie and myself, as commander in chief. The game was played on 6 on 8 ft. (arround 185x245 cm) table. The aim of the game was to controll the village defended by Mahdists against Egyptian forces att the end of the game.
Zapewne pamiętacie jeden z moich wcześniejszych wpisów, poświęcony systemowi Death in the Dark Continent. Jeśli nie, tutaj macie link do wcześniejszej relacji. Podczas naszego czwartkowego spotkania w klubie, zdecydowaliśmy się na małe odświeżenie tych zasad. Grę zorganizował Colin Jack, i dostarczył wszystkich potrzebnych elementów: figurek, terenów itp. Zdecydował się również poprowadzić grę. W tej grze stroną egipską dowodzili: Bill Gilchrist i Angus Konstam, natomiast Mahdyści byli prowadzeni przez Donalda Andersona, Campbella Hardie i mnie, jako głównodowodzącego. Gra toczyła się na stole 6 na 8 stóp (około 185x245 cm). Celem gry było posiadanie kontroli nad wioską, bronionej przez Mahdystów przed siłami egipskimi, na zakończenie gry.
The battlefield. Pole bitwy.

Remembering the last battle and the power of our Bejas, in melee, my tactic was more aggressive than that, which I have used in the previous fight. I opted for the general assault on the main Egyptian forces. I expected that the Egyptians will try to take advantage of their firearms and they will be from the safe distance strike on our troops, not letting them for melee. In this way they want to break us and then without any problems, be able to take the village. To get our Bejas for appropriate distance to allow them for melee, I had to use the trick of war. I set in front of them heavy cavalry, and troops armed with firearms. Their task was as long as possible protecting our Bejas from the Egyptian fire, even at the cost of their lifes. On our flanks I placed Jihadiya troops. On the left it moves hidden and as support had an Ansar unit and a light field gun on right.
Initially fighting went in our way. Cavalry, and one of the Ansar unit(both being a cover for Bejas) made their way forward whilst the troops on the wings tryed to secure the center of the field. The Egyptians began to form a giant line that would possibly stop the Mahdists. Ansars on our lef had been charged by Egyptian light cavalry. Melee did not bring a decisive result and both sides have to withdraw to the initial positions. The second charge of Egyptians led to the destruction of Ansar, in spite of the unexpected support of hidden Jihadiyas. Cavalrymen broke our left wing and get on our backs. I decided to attack them with one of our Beja units not to allow the Egyptians to occupy the village. Bejas showed their strength in melee and the threat was averted. Meanwhile, our heavy cavalry and the second Ansar unit came under heavy fire of the Egyptian infantry. After a few their shots, our cavalry was destroyed and and our Bejas had left without protection. On the right wing, commanded directly by me, fulfilled artillery duel between our and Egyptian gun, which I managed to win. In this way we could freely choose targets and with support the other branches Jihadiya unit we slowly crushed Egyptian forces on their left flank. Finally, the Egyptians decided to attack with their heavy cavalry, but our Bejas again showed their strength. After defeating the cavalry Bejas attack on Egyptian regular infantry, but were broken by gunfire. This loss meant that the Egyptians taken a temporary advantage. Effective fire from our wings pinned the Egyptians and they were unable to move forward. We used this situation and our last remaining Bejas attack Egyptians.. The melee confirmed once again their great strengh and Egyptian forces were defeated. In this situation, the game was over. The Egyptians did not have the chance to occupy the village and lost the battle.
It was another interesting game with this interesting and also an easy system. Soon we will back to this rules. I'm very curious to see how Mahdists would deal with an infantry armed with machine guns. Would Bejas be able to stand in melee against regular British infantry. We will try to answer on these questions and any others in the next possibly games. 
Pamiętając ostatnią bitwę i siłę naszych Bejów w walce wręcz, moja taktyka była bardziej agresywna od tej jakiej użyłem w poprzedniej walce. Zdecydowałem się na generalny szturm głównych sił egipskich. Spodziewałem się, że Egipcjanie będą starali się wykorzystać przewagę broni palnej i będą z bezpiecznej odległości razić nasze oddziały, nie pozwalając na walkę wręcz i w ten sposób będą chcieli nas złamać, by następnie bez żadnych problemów, móc zająć wioskę. Aby móc podprowadzić naszych Bejów na odpowiednią odległość pozwalającą na walkę wręcz musiałem użyć fortelu wojennego. Przed nimi ustawiłem ciężką kawalerię, oraz oddziały uzbrojone w broń palną. Ich zadaniem było jak najdłuższe ochranianie Bejów przed ogniem egipskim nawet za cenę utraty jednostek osłaniających. Na naszych flankach umieściłem oddziały Jihadijów, w tym jeden z nich na naszym lewym skrzydle poruszał się w ukryciu oraz dodatkowo wsparci przez Ansarów, a na prawym Jihadijów wspomagało lekkie działo polowe.
Początkowo walka układała się po naszej myśli. Kawaleria i jeden z oddziałów Ansarów (stanowiących osłonę Bejów) wysforowali się do przodu a oddziały na skrzydłach starały się zabezpieczyć środek pola. Egipcjanie przystąpili do tworzenia gigantycznej linii, która miała zatrzymać Mahdystów. Na naszym lewym skrzydle uderzyła lekka konnica egipska i zaszarżowała oddział Ansarów. Walka wręcz nie przyniosła decydującego rezultatu i obie strony musiały wycofać się na pozycje wyjściowe. Druga szarża Egipcjan doprowadziła do zagłady Ansarów, pomimo nieoczekiwanego wsparcia Jihadijów. Kawalerzyści rozerwali lewe skrzydło i wdarli się na nasze tyły. Zdecydowałem się uderzyć na nią jednym z naszych oddziałów Bejów, aby nie pozwolić Egipcjanom na zajęcie wioski. Walka wręcz pokazała siłę Bejów i zagrożenie zostało zażegnane. Tymczasem nasza ciężka kawaleria i drugi oddział Ansarów dostali się pod ciężki ogień egipskiej piechoty. Po kilku salwach nasza kawaleria została rozbita i Bejowie znaleźli się niebezpiecznie odkryci. Na prawym skrzydle, bezpośrednio dowodzonym przeze mnie, wywiązał się pojedynek artyleryjski pomiędzy naszym działem, a działem egipskim, który udało się mi wygrać. Dzięki temu nasze działo swobodnie mogło wybierać sobie cele, a dodatkowo wsparte ogniem drugiego z oddziałów Jihadijów powoli rozkruszało siły na egipskiej lewej flance. W końcu Egipcjanie zdecydowali się zaatakować resztkami swojej ciężkiej kawalerii, ale Bejowie znów pokazali swoją siłę. Po zwyciężeniu kawalerii Bejowie przypuścili atak na regularną piechotę egipską, jednak zostali rozbici ogniem karabinów. Ta strata spowodowała, że Egipcjanie zdobyli chwilową przewagę. Skuteczny ostrzał z naszych skrzydeł przygwoździł Egipcjan i nie byli w stanie wykonać ruchu naprzód. Wykorzystaliśmy tą sytuację i tym razem oba pozostałe oddziały Bejów ruszyły do ataku. Walka wręcz jeszcze raz potwierdziła ich znakomita przewagę i siły egipskie zostały rozbite. W tej sytuacji walka się zakończyła. Egipcjanie nie mieli szans na zajęcie wioski i przegrali bitwę.
Była to kolejna ciekawa rozgrywka z tym arcyciekawym i arcyłatwym systemem. Wkrótce znów do niego wrócimy. Jestem bardzo ciekawy, jak Mahdyści poradzili by sobie z piechotą uzbrojona w karabiny maszynowe. Czy Bejowie byli by w stanie sprostać w walce wręcz regularnej piechocie brytyjskiej. Na te pytania jak i inne postaramy się odpowiedzieć w ciągu następnych gier.
Mahdists. Mahdiści.

Right wing and center of the Egyptian forces. Prawe skrzydło i centrum sił egipskich.

Egyptian heavy cavalry with light field gun. Egipska ciężka kawaleria wraz z lekkim działem polowym.

Egyptian light cavalry being slaughtered by Bejas. Egipska kawaleria wyrzynana przez Bejów.

Egyptian wall of fire. Egipska ściana ognia.

Decisive moment of the game: heavy cavalry vs. Bejas. Decydujący moment gry: ciężka kawaleria przeciwko Bejom.

The game is over. Gra jest zakończona.
For more pictures you can visit my flickr:
Więcej zdjęć możecie zobaczyć na moim flickr:

OdB of the game:
OdB gry:

EGYPTIANS:
  • Hick Pasha, disciplined
  • Raw Soldiers with breechloaders (1)
  • Raw Soldiers with breechloaders (2)
  • Raw Soldiers with breechloaders (3)
  • Bazingers, untrained soldiers with muskets (1)
  • Bazingers, untrained soldiers with muskets (2)
  • Bashi Bazouks, untrained skirmishes with muskets
  • Mounted Bashi Bazouks, untrained light horse
  • Heavy cavalry
  • Medium rifled field gun

MAHDISTS:
  • Uthman Digna, organised
  • Heavy Camelry
  • Jihadiya, soldiers with breechloaders
  • Jihadiya, elite soldiers with muskets, hidden
  • Beja, elite warriors (1)
  • Beja, elite warriors (2)
  • Beja, elite warriors (3)
  • Ansar, untrained skirmishes with muskets
  • Ansar, skirmishes with spears
  • Untrained light field gun