sobota, 23 kwietnia 2022

Return of the Saga. Powrót Sagi.

After a long time, the new version of Saga returns to the club. It used to be a very popular system in our club, but later it was replaced by other rules. Then Saga had its version 2, but somehow we never tried it. Finally, we decided to give it a chance.

Po długim okresie Saga powraca do naszego klubu. Kiedyś był to bardzo popularny u nas system, jednak później został zastąpiony przez inne zasady. Potem Saga miała swoją wersję 2, ale jakoś nigdy jej nie spróbowaliśmy. W końcu daliśmy jej szansę.


SCENARIO / SCENARIUSZ: From the main book
UMPIRING / PROWADZENIE GRY: Mike Evans
SCENERY / SCENERIA: Mike Evans, SESWC
FIGURES & MODELS / FIGURKI I MODELE: Mike Evans

We tried the multiplayer scenario from the main book (or from the supplement, but I'm not sure about it). We had Vikings (Alisdair, Mike and myself) versus Normans (Angus and Peter) clash. Both sides had 3 bands 4 points each. We played with one board per side. It finished with Norman's victory, as 2 of our bands get demoralised (not me ;)). It was a fun game and we will continue it for a few next evenings.

Spróbowaliśmy scenariusza dla wielu graczy z głównego podręcznika (albo z jakiegoś dodatku, tutaj nie jestem tego pewien). Starli się Wikingowie (Alisdair, Mike i ja) z Normanami (Angus i Peter). Obie strony miały 3 oddziały po 4 punkty, z jedną tablicą na stronę. Skończyło się zwycięstwem Normanów, ponieważ dwa z naszych oddziałów (nie mój ;) ) zostały zdemoralizowane. Gra nam się spodobała i wykorzystamy ją jeszcze w ciągu kilku następnych wieczorów.


Gallery on Flickr:

https://www.flickr.com/photos/asienieboje/albums/72177720298324922

piątek, 15 kwietnia 2022

Raszyn 1809.

After many years of constantly persuading Michael to enter Napoleonic, it finally worked! In secret from everyone, he painted the large Austrian army! It was time to finally test them on the table. For that, I chose the battle of Raszyn, fought on 19.04.1809, when Poles stopped Austrians for enough time to start negotiations which finished with withdrawing all Polish army on the right bank of the Vistula river and finally led to Polish victory in the whole war. For our game, we used Black Powder rules with A Clash of Eagles supplement.

Po wielu latach namów Michaela by wszedł w napoleonkę, w końcu sukces! W sekrecie przed wszystkimi pomalował sobie dużą austriacką armię! Trzeba było więc ich przetestować. Do tego wybrałem bitwę pod Raszynem, stoczoną 19.04.1809, w której Polacy zatrzymali Austriaków na tyle długo by zacząć pertraktacje zakończonej wyprowadzeniem polskiej armii na prawy brzeg Wisły a w końsekwencji wygrania całej wojny. Do naszej gry użyliśmy zasad Black Powder z dodatkiem A Clash of Eagles.


SCENARIO / SCENARIUSZ: Bartek Żynda
UMPIRING / PROWADZENIE GRY: Bartek Żynda
SCENERY / SCENERIA: Michael Schneider, SESWC
FIGURES & MODELS / FIGURKI I MODELE: Michael Schneider, Bartek Żynda, Campbell Hardie

1. Forces. Siły.


DUCHY OF WARSAW / KSIĘSTWO WARSZAWSKIE
(Alisdair)

CinC (level 9)

1st Infantry Brigade (level 8)

1 x Voltiguers

2nd Infantry Brigade (level 8)

2 x Infantry Battalion
1 x Light Gun

3rd Infantry Battalion (level 8)

1 x Voltiguers
2 x Infantry Battalion

4th Infantry Battalion (level 8)

1 x Voltiguers
2 x Infantry Battalion
1 x Light Gun

Light Gun Battery (level 8)

2 x Light Gun

Cavalry Brigade (level 8)

1 x Ułan Regiment
1 x Ułan Half Regiment
1 x Chasseurs
1 x Hussars (Saxon)
1 x Horse Gun


AUSTRIA
(Michael, all level 8)

VANGUARD

CinC

1 x Infantry Battalion (large)
1 x Horse Gun
2 x Hussar Regiment (large)

MAIN FORCES

1st Infantry Brigade

2 x Infantry Battalion (large)
1 x Light Gun

2nd Infantry Brigade 

2 x Infantry Battalion (large)
1 x Light Gun

3rd Infantry Brigade

2 x Grenadier Battalion (large)

1st Cavalry Brigade

2 x Chasseur Regiment (large)

2nd Cavalry Brigade

2 x Cuirassier Regiment (large)

2. The game. Gra.

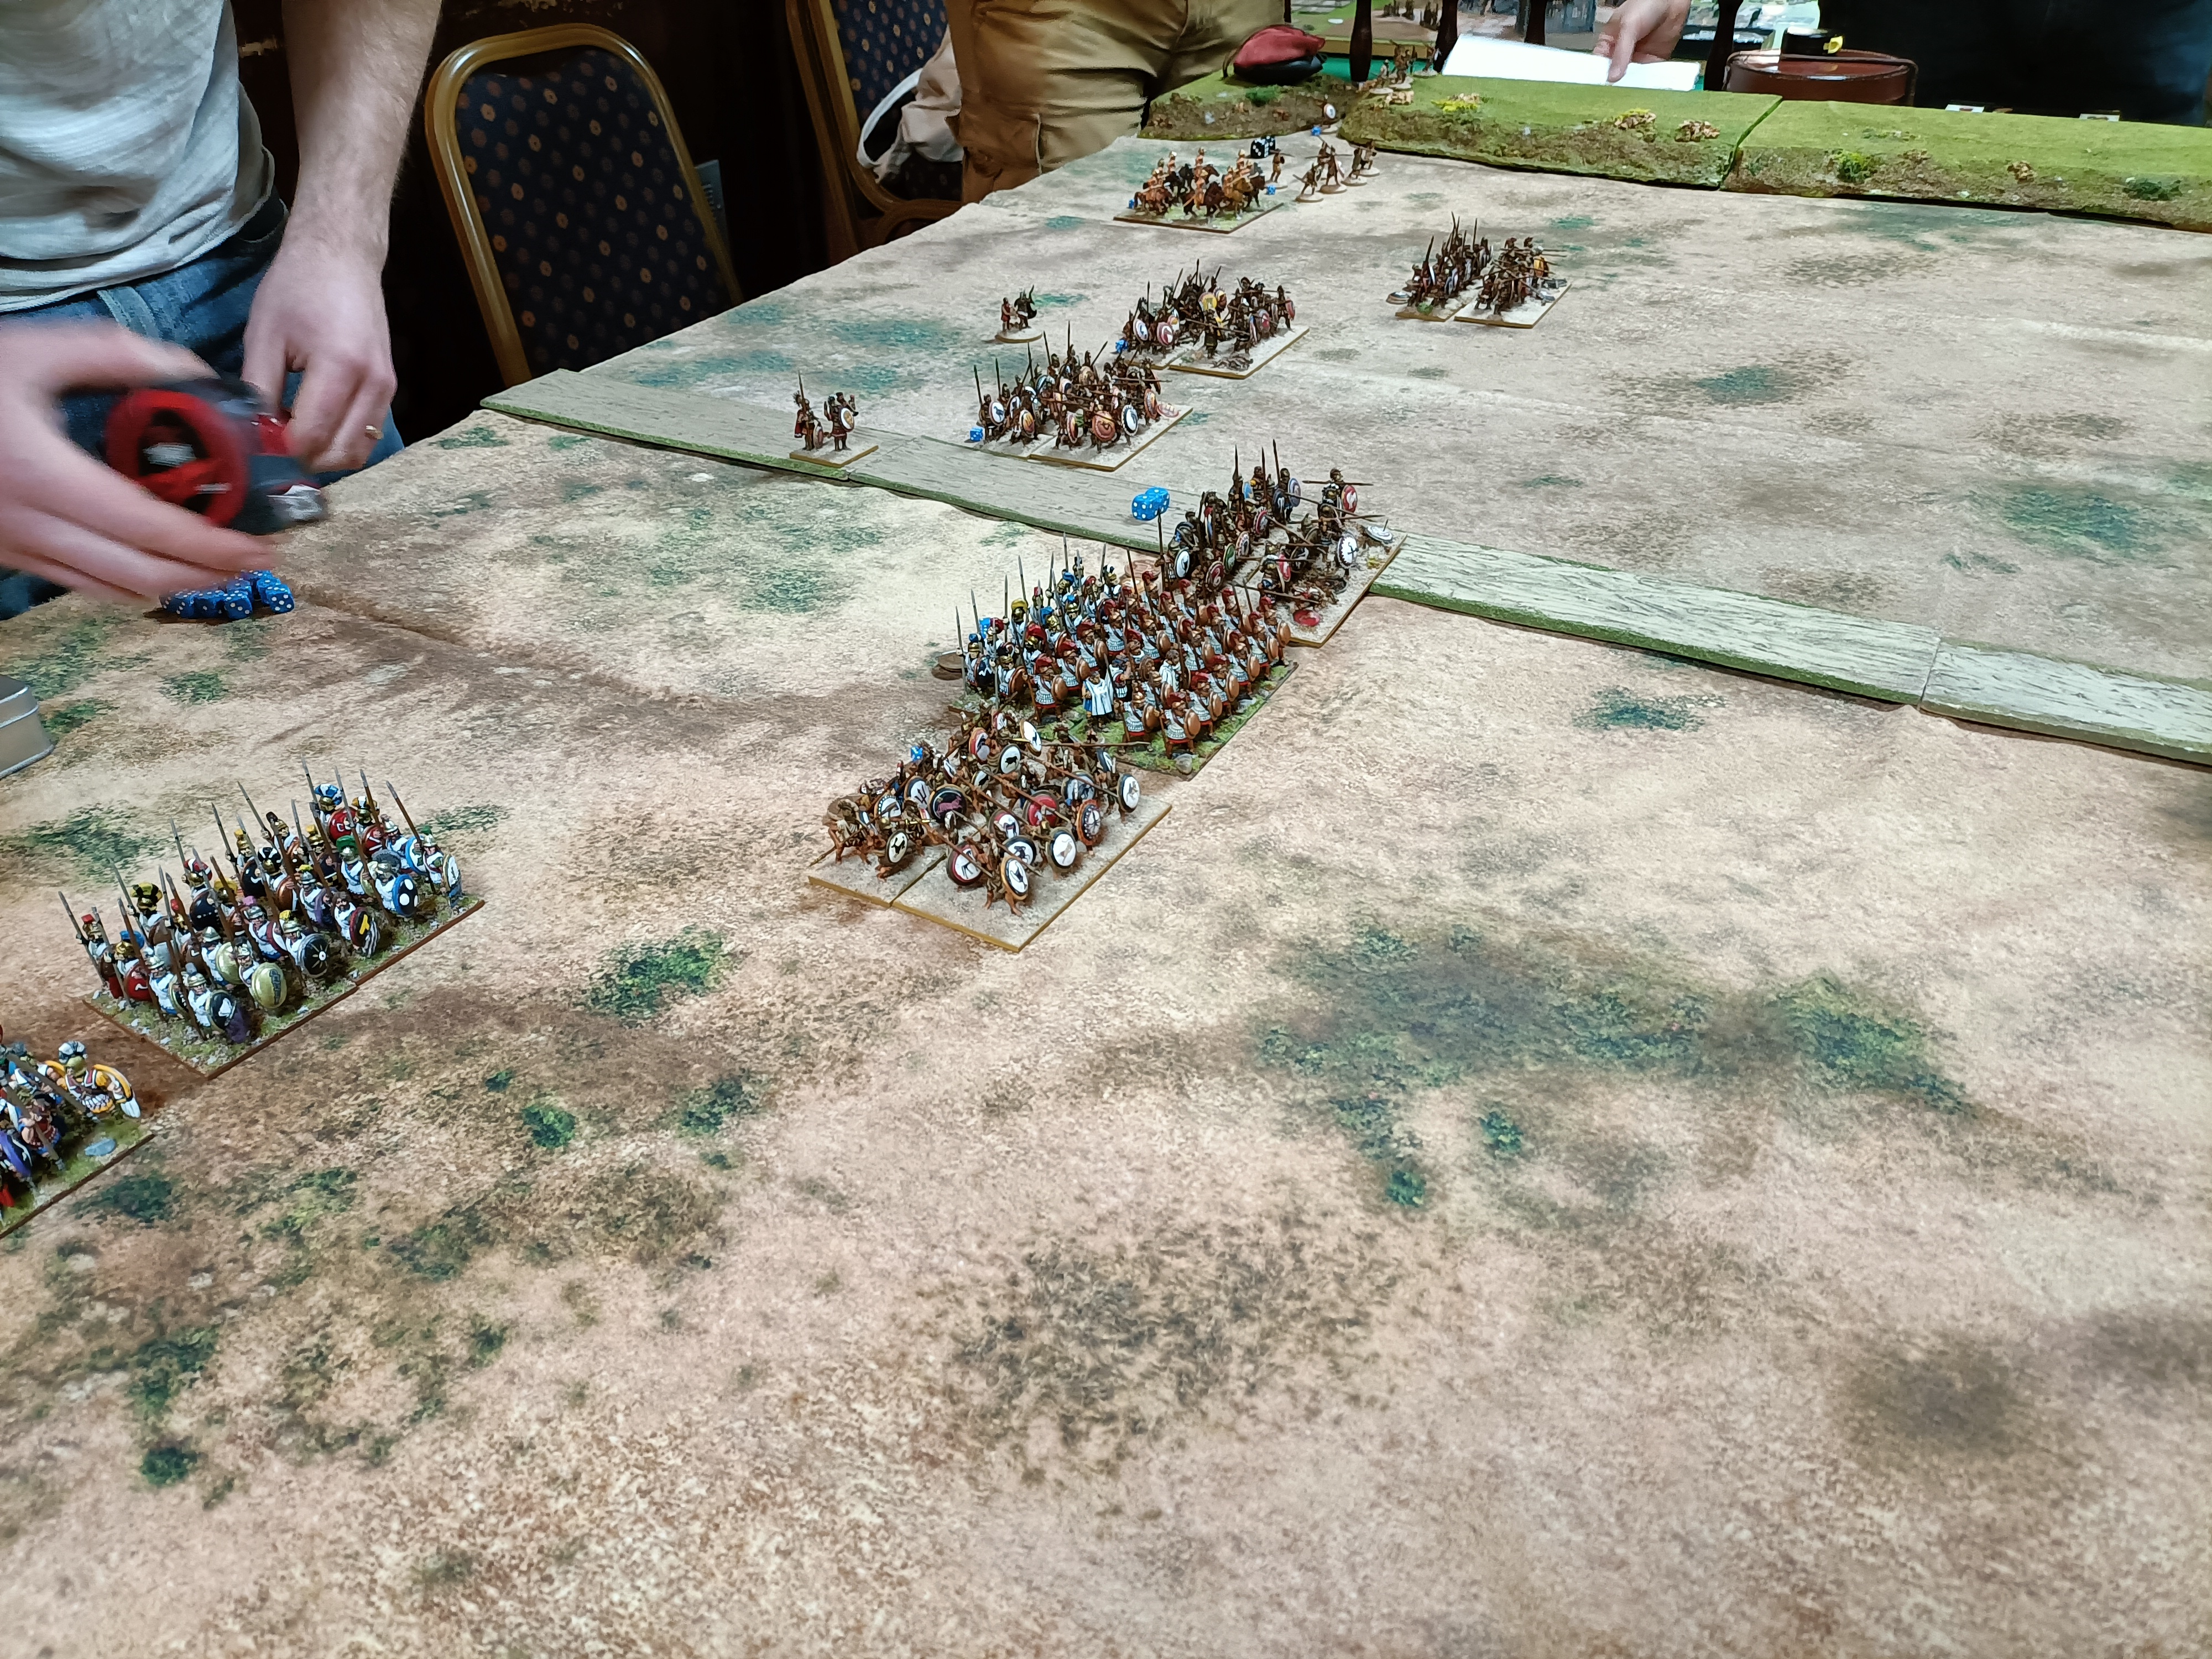
Before I deployed Poles on the table (they deployed historically), Michael had to write a map with the way his forces will enter the table. As usual in my games, if one bridge fails its order, it will stop other brigades behind from entering the table. Michael has chosen that his whole will enter on his right flank, supported by most of his infantry. Small forces would enter the table on his left.

Przed tym jak wystawiłem Polaków (którzy ustawieni byli historycznie), Michael musiał wykonać mapę z zaznaczonym wejściem i porządkiem jego oddziałów. Jak to zwykle w moich grach bywa, jeśli jednej z brygad nie powiedzie się wykonanie rozkazu, blokuje ona wejście brygadom znajdującym się za nią. Michael całą swoją kawalerię, wspartą większością piechoty wysłał na prawą flankę. Mniejsze oddziały weszły po lewej stronie.


Alisdair quickly responded to that with his cavalry charges. He managed to force the Austrian cavalry vanguard to withdraw, but then he find himself under heavy fire from Austrian infantry.

Alisdair szybko odpowiedział na to szarżą swojej kawalerii. Udało mu się zmusić do odwrotu kawalerię austriacką straży przedniej, ale wtedy dostał się pod ciężki ogień austriackiej piechoty.


That did not stop Austrian from entering the table. Soon there were a lot of them. The large size of the Austrians units appeared to be against them, especially on the small area of the table. Poles together with Saxons charged on march columns of the Austrian cavalry and again managed to force them to withdraw. Unfortunately for Poles, they suffered the casualties too, mostly because of the Austrian guns and muskets. Another attack of the Austrian cavalry pushed them back with heavy casualties (both ułan regiments broke). 

To nie powstrzymało Austriaków przed wprowadzaniem nowych oddziałów na stół. Wkrótce była ich cała masa. Duże rozmiary oddziałów austriackich okazały się dla nich zgubne, specjalnie na ograniczonej przestrzeni stołu. Polacy wspólnie z Sasami zaszarżowali na kolumny marszowe austriackiej kawalerii i ponownie zmusili je do odwrotu. Niestety dla Polaków, przy okazji ponieśli duże straty w wyniku ostrzału z austriackich dział i muszkietów. Kolejny atak austriackiej kawalerii odrzucił ich z ciężkimi stratami (oba pułki ułanów zostały zniszczone).


On the other side, Austrians kept their distance from Polish positions and did nothing. They just fired their guns a few times, without any result. We finished the game with a Polish victory, however, the size of the table and time of the club night wasn't in Austrian favour. Possible we will refight that game sometime on Sunday.

Po drugiej stronie Austriacy trzymali dystans do polskich pozycji i nie zrobili nic. Oddali kilka salw z ich dział, ale bez rezultatu. Zakończyliśmy grę z polskim zwycięstwem, ale prawdę powiedziawszy rozmiar stołu i czas rozgrywki był wyraźnie przeciw Austriakom. Możliwe, że jeszcze raz rozegramy tą grę kiedyś w niedzielę.


3. Links. Linki.

Michael:

https://meneken.blogspot.com/2022/04/1809-battle-of-razyn-my-austro.html

SESWC:

https://www.facebook.com/Seswc.co.uk/posts/4988246284546638

Flickr:

https://www.flickr.com/photos/asienieboje/albums/72177720298134559

niedziela, 3 kwietnia 2022

Somewhere in Greece, 425 BC. Gdzieś w Grecji, 452 p.n.e.

This time Peloponnesian War with Hail Caesar rules spiced with some Homebrew in 28mm. Both Michael and Mike joined their collections and created an interesting game for us.

Tym razem wojny peloponeskie z zasadami Hail Caesar przyprawionymi kilkoma domowymi zasadami w skali 28mm. Michael i Mike połączyli swoje kolekcje i przygotowali dla nas bardzo ciekawą grę.


SCENARIO / SCENARIUSZ: Michael Schneider
UMPIRING / PROWADZENIE GRY: Michael Schneider
SCENERY / SCENERIA: Michael Schneider, SESWC
FIGURES & MODELS / FIGURKI I MODELE: Michael Schneider, Mike Evans

1. Forces. Siły.


SPARTA

Right Flank (Campbell)

1 x King's Bodyguard Hoplites
1 x Allied Armoured Hoplites
2 x Javelins
1 x Cavalry

Centre (Peter)

1 x Spartan Armoured Hoplites
1 x Allied Armoured Hoplites
1 x Allied Unarmoured Hoplites

Left Flank (Mike)

2 x Allied Armoured Hoplites
1 x Slingers
2 x Javelins
1 x Cavalry


ATHENS / ATENY

Right Flank (Bartek)

2 x Allied Armoured Hoplites
2 x Javelins
1 x Slingers
1 x Cavalry

Centre (Angus)

1 x Large Allied Armoured Hoplites
1 x Allied Armoured Hoplites
1 x Allied Unarmoured Hoplites

Left Flank (Alisdair)

3 x Athenian Armoured Hoplites
2 x Javelins
1 x Cavalry


2. The game. Gra.

It started with all cavalries charging each other. On my side, I traditionally lost  Greek men on horses and also one unit with javelins. Luckily for me, Mike's cavalry had to withdraw because of the number of casualties suffered during the attack, which saved my flank. On the other side, Alisdair fought against Campbell's light troops. Athenians won there, so we finished with some kind of draw.

Zaczęło się od szarż wszystkiej kawalerii. Po mojej stronie, tradycyjnie straciłem moich Greków na koniach oraz jeden oddział z oszczepami. Na szczęście dla mnie, kawaleria Mike'a musiała się wycofać, ze względu na poniesione straty podczas jej ataku, co ocaliło moją flankę. Po drugiej stronie Alisdair walczył z Campbellem i jego lekkimi oddziałami. Ateńczycy wygrali, więc skończyliśmy w swego rodzaju remisem.


None of the light troops could win the game alone, that had to be decided by hoplites. Both sides moved slowly against each other, apart from my troops. I had terrible command rolls and my units were left behind very much. Finally, Alisdair Athenians clashed with Cambell's Spartans and Peter's Spartan Allies with Angus' Athenian Allies.  The fight was fierce, and soon Athenians (the Athenian leader get killed) were defeated by the Spartans. However, Athenian Allies managed to repulse the attack and were able to fight the Spartans.

Żaden lekki odział nie był w stanie wygrać gry samemu, ta miała się rozstrzygnąć w starciu hoplitów. Obie strony powoli ruszyły przeciw sobie, oprócz moich oddziałów. Miałem tragiczne rzuty na dowodzenie i wkrótce moje oddziały pozostały daleko w tyle. W końcu Ateńczycy Alisdaira starli się ze Spartanami Campbella a spartańscy sojusznicy Petera z ateńskimi sojusznikami Angusa. Walka była zażarta, ale wkrótce Ateńczycy zostali pokonani (ateński dowódca został zabity) przez Spartan. Jednakże ateńskim sprzymierzeńcom udało się odeprzeć atak i byli gotowi by walczyć ze Spartanami.


Finally and I managed to move my hoplites into the fight. I clashed with Mike's forces. The fight was long but finally, I forced him for a morale test. He rolled double 1 and his entire force evaporated! We finished our game at his stage and both sides declared a draw. 

W końcu i moim oddziałom udało się dołączyć do walki. Starłem się z Mike'm. Walka była długa, ale w końcu udało mi się zmusić go do testu morale. Wyrzucił dublet jedynek i całe jego siły wyparowały! W tym momencie zdecydowaliśmy się zakończyć grę i ogłosiliśmy remis.


3. Links. Linki.

Michael:

to be updated soon...

Campbell (SESWC):

to be updated soon...

Flickr:

https://www.flickr.com/photos/asienieboje/albums/72177720297823730