
Updates continued. Today game played two weeks ago at our Club. 90th American Infantry Division versus Pancer Brigade 106 with the Rapid Fire rules. The original scenario comes from the 20th Century Wargaming.
Kontynuacja aktualizacji. Dzisiaj gra sprzed dwóch tygodni rozegrana w naszym klubie. Amerykańska 90. Dywizja przeciwko 106. Brygadzie Pancernej przy użyciu zasad Rapid Fire. Oryginalny scenariusz pochodzi ze strony 20th Century Wargaming.
SCENARIO/SCENARIUSZ: Brad Smith (20th Century Wargaming)
GAME UMPIRING/PROWADZENIE GRY: Bill Gilchrist
SCENERY/SCENERIA: Bill Gilchrist, Colin Jack, SESWC
MODELS&FIGURES/ MODELE I FIGURKI: Bill Gilchrist
1. Ordre de Bataille.

Germans/Niemcy:
(Richard, Bartek Żynda)
StosseGruppe 1, Panzer Brigade 106
StosseGruppe HQ: (PzKpfw V "Panther", "Wirbelwind")
1st Coy (2 x PzKpfw V "Panther")
2nd Coy (2 x PzKpfw V "Panther")
3rd Coy (2 x PzKpfw V "Panther")
Volksgrenadier Coy (8 fig with SMG) as the tank riders
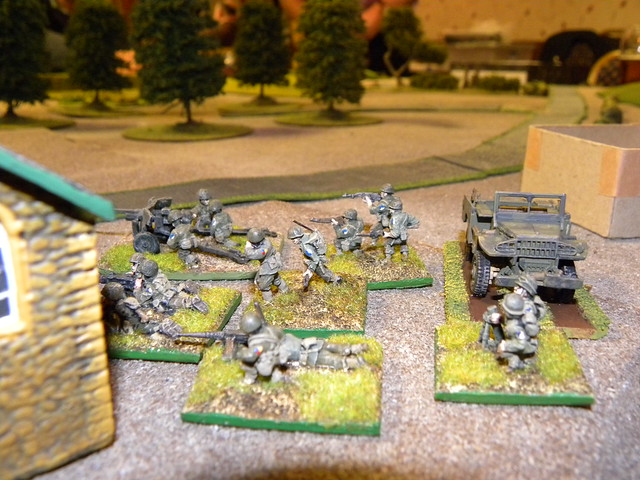
Composite Armoured PzGrenadier Battalion:
HQ : (6 fig) on SdKfz 251/10
1st Coy (8 fig) on SdKfz 251/1
2nd Coy (8 fig) on SdKfz 251/1
Engineering Coy (8 fig inc flamethrower) on SdKfz 251/1
MMG Coy (1 MMG with 3 crew) on SdKfz 251/1
SdKfz 251/21

Americans/Amerykanie:
(Colin Jack, Campbell Hardie, Tim Watson)
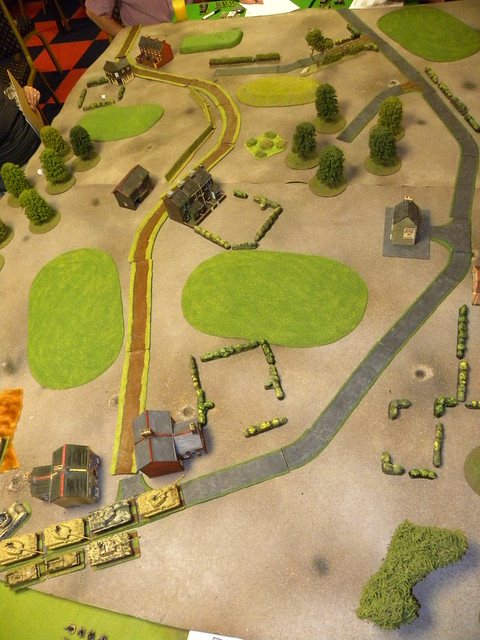
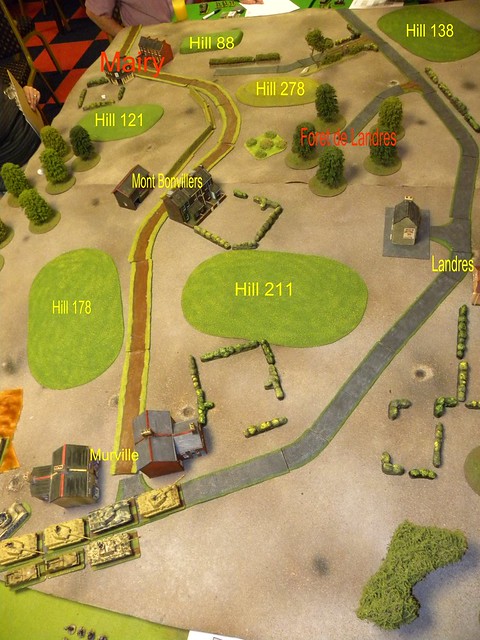
Elements 90th Infantry Division HQ units start in the Wooded area "Foret de Landres":
90th Div Signal HQ Company (8 fig incl bazooka) + M8 Armoured Car
90th Div Artillery HQ Company (8 fig incl bazooka) + M4 Sherman (75mm) FO tank
949th Field Artillery Battalion (1 FO jeep + 3 x 155mm Howitzers (off table))
344th Field Artillery Battalion (1 FO jeep + 3 x 155mm Howitzers (off table))
Reinforcements:
I/358 Infantry Battalion:
HQ (6 fig)
1st Coy (10 fig incl bazooka)
2nd Coy (10 fig incl bazooka)
3rd Coy (10 fig incl bazooka)
Heavy Coy (57mm ATG, HMG, MMG, 81mm Mtr - 11 crew)
Attached: M7 SP How
II/359 Infantry Battalion:
HQ (6 fig)
1st Coy (10 fig incl bazooka)
2nd Coy (10 fig incl bazooka)
3rd Coy (10 fig incl bazooka)
Heavy Coy (57mm ATG, HMG, MMG, 81mm Mtr - 11 crew)
Attached: Tank Coy (M4 Sherman (75mm), M4 Sherman (76mm))
III/359 Infantry Battalion:
HQ (6 fig)
1st Coy (10 fig incl bazooka)
2nd Coy (10 fig incl bazooka)
3rd Coy (10 fig incl bazooka)
Heavy Coy (57mm ATG, HMG, MMG, 81mm Mtr - 11 crew)
Attached: Tank Coy (3 x M5 Stuart)
Each Infantry battalion enters in the following order:
Turn 3: Infantry Company
Turn 5: Battalion HQ Coy + Heavy Coy
Turn 7: Infantry Company + Attached
Turn 9: Infantry Company
2. Orders. Rozkazy.
German
Objectives
- Clear Mairy for at least one ‘turn end’
- Clear ‘Forêt de Landres’ for at least one ‘turn end’
- Exit 2 companies off table edge at A5 or A6 by game end
- More American troops destroyed than German.
Germans
achieve:
- 4 Objectives: Major German victory
- 3 Objectives: Minor German victory
- 2 Objectives: Draw
- 1 Objectives: Minor American victory
- 0 Objectives: Major American victory
Game End
The game lasts 10 turns initially. Then ‘Sudden Death’ turns
start:
- Roll 1D10 at the beginning of each turn.
- If 1D10 < (Sudden Death x 2) then game ends.
Visibility:
The game starts in the early morning hours of darkness.
‘Darkness’
Turns – Visibility: 6”
- Maximum movement - Roads: 9”, Other: 6”
‘Dawn’
Turns – Visibility: 12”
- Maximum movement - Roads: 15”, Other: 6”
‘Day’
Turns – Visibility: Unlimited
- No movement restrictions
‘Darkness’
to
‘Dawn’:
- Roll 1D10 at the beginning of each turn.
- Divide the die roll by 2 (round down).
- If this is less than the turn number, ‘Dawn’ has arrived.
- ‘Day’ arrives automatically two turns after ‘Dawn’.
3. The Game. Gra.
The Lorraine Campaign is very popular in my club. However I never played it with Rapid Fire. I still have in my mind the quality of German troops in that campaign, most of them were very poor and this feature determinated my plan for the game. According to that, my main task was to clear the "Foret de Landres" and in the correct time evacuate 2 companies off the table before the end of the game. To fulfill this plan I divided German troops in two groups: first, under my command (they have to clear the forrest) and the second, under Richard's (they were ordered to clear Mont Bonvillers, marking the attack on Mairy and on my command withdraw all their troops off the table). In that way I had a big chances to achieve 2 objectives and secure the draw. The clearing of Mairy was from the beggining of the game consider as "Mission Imposible", so I did not even thinking about realising that plan. However, I had a hope, that my opponents would consider that attack, as it would be exactly what I normally do, but not this time. Surprise!
Kampania Lorraine jest dość popularna w naszym klubie. Jednakże nie miałem jeszcze możliwości zagrania jej przy użyciu Rapid Fire. Cały czas mam w pamięci jakość niemieckich jednostek tej bitwy, większość z nich była bardzo niska i ta cecha determinowała mój plan. Zgodnie z tym moim głównym zadaniem było oczyścić "Foret de Landres" i w odpowiednim momencie ewakuować dwie kompanie ze stołu przed końcem gry. By wypełnić ten plan podzieliłem niemieckie siły na dwie grupy: pierwsza, pod moją komendą (mieli za zadanie oczyścić las) i druga, pod dowództwem Richarda (otrzymali rozkaz oczyszczenia Mont Bonvillers, markowanie ataku na Mairy i w odpowiednim czasie na moją komendę opuścić pole bitwy wszystkimi dostępnymi oddziałami). w ten sposób miałem szansę na wykonanie dwóch zadań i w ten sposób zapewnić sobie przynajmniej remis. Oczyszczenie Mairy od samego początku nie było brane pod uwagę i było uważana za "Mission Impossible". Miałem jednak nadzieję, że moi przeciwnicy, znający mój sposób grania wezmą taki atak pod uwagę, ale nie tym razem. Niespodzianka!
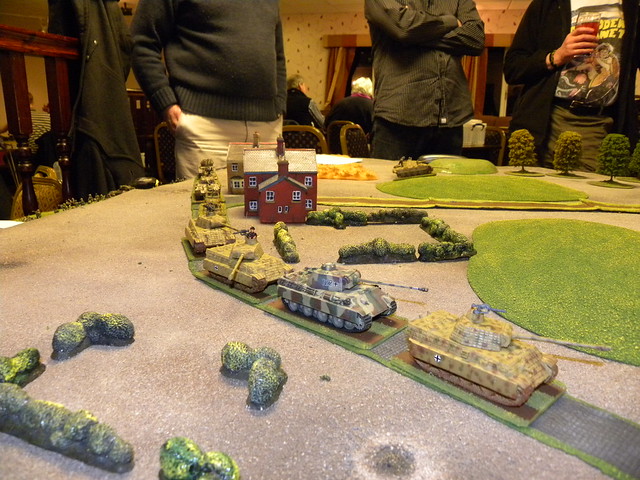
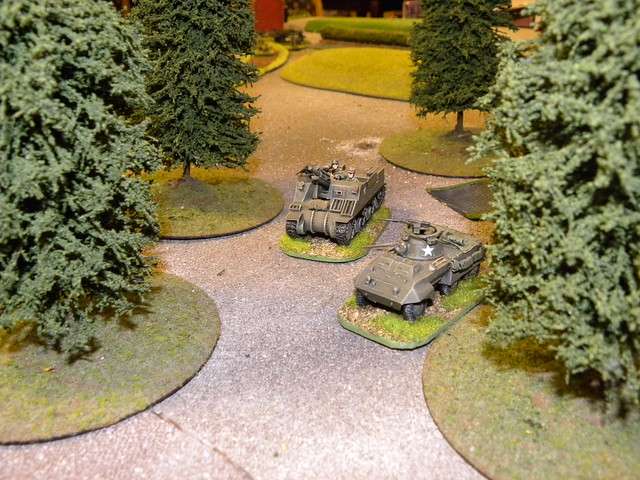
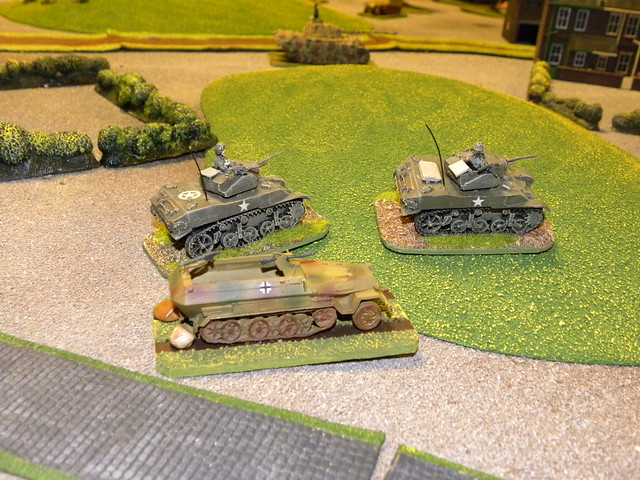
My attack on the forest was determinated by the time of the day. Till the end of turn 4 or 5 my tanks moved with reduced speed, becouse of the darkness. Finally when the daylight came I get under the fire from the American howitzers. It destroyed one of my Panthers and becouse of the failed morale test my HQ had to withdraw to the suburbs of Mont Bonvilliers. Rest of my Kampfgruppe continued the attack. They had to faced the flank attack from the II/359 and from the back the III/359. My tanks had destroyed all Shermans, however the Stuarts were the couse of the serious problems of my infantry. They managed to destroy my MMG Company, Wirlbewind and one of the halftrucks. I had to send against them one of my Panthers, to finally stop them. This issue did not stopped my main forces to clear the forest of the remaining American forces, and at the end of turn 9, the forest was cleared (objectives gained).
Mój atak na las był determinowany przez porę dnia. Do końca tury 4. lub 5. moje czołgi poruszały się ze zredukowaną prędkością z powodu ciemności. W końcu się rozjaśniło i w ten sposób znalazłem się pod ogniem amerykańskich haubic. Ich ogień zniszczył jedną z moich Panther i spowodowała, że na wskutek nie zdania testu morale, moje dowództwo znalazło się na przedmieściach Mont Bonvilliers. Reszta mojej Kampfgruppe kontynuowała atak. Musieli jednak sprostać atakowi z flanki przez II/359 i od tyłu przez III/359. Moje czołgi zniszczyły wszystkie Shermany, jednak Stuarty sprawiły mojej piechocie dość poważne problemy. Udało im się zniszczyć moją kompanię karabinów maszynowych, Wirlbewinda i jeden z halftrucków. Przeciwko nim musiałem wysłać jedną z moich Panther, aby w końcu jakoś je powstrzymać. Jednakże te problemy nie zatrzymały moich głównych sił, które wyczyściły las z sił amerykańskich i na koniec tury 9., las był oczyszczony (cel został osiągnięty).

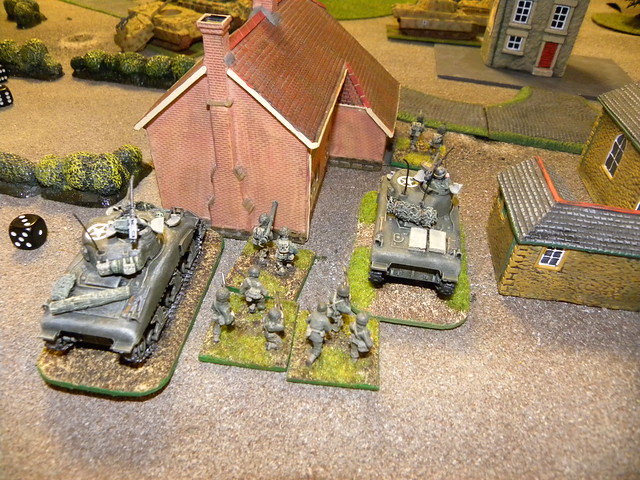


Richard had very boring task. For the most of the game he had to hold the positions and waiting for the withdraw order. I was really sorry for him, but this was the one of the main conditions of not lost the game. Few times I had to really stop him tried crossing the marked line. However, Richard managed to clear the Mont Bonvilliers, destroyed the elements of the III/359 attacking him from the flank and stopped the marching of the I/358 attacking from the Mairy. At the turn 10th he received the order to withdraw and in that way he fulfill his task.
Richard miał dużo bardziej nudne zadanie. PRzez większość czasu musiał utrzymywać pozycje i oczekiwać na rozkaz do odwrotu. Było mi go bardzo żal, ale to był jeden z głównych warunków by nie przegrać gry. Kilka razy musiałem go powstrzymywać przed przekraczaniem wyznaczonej mu linii. Po mimo tego Richardowi udało się znisczyć elementy III/359 atakujące go od flanki i zatrzymać marsz atakującej go od strony Mairy I/358. W turze 10. otrzymał w końcu rozkaz do odwrotu i zadanie to wykonał.


During the game we managed to achieved only two objectives, so the game finished with the draw. Unlike in real battle we did not suffered disaster like the Germans did on the 8th of September 1944, so we could called it a winning draw!
Podczas gry osiągnęlismy jedynie dwa cele, w związku z czym gra zakończyła się remisem. W odróżnieniu jednak do prawdziwej bitwy nie zostaliśmy rozbici tak jak to stało się z Niemcami 8 września 1944 roku, więc możemy sobie przyznać zwycięski remis!
Gallery on flickr:
Galeria na flickr:
Nice report for this Lorraine campaign, great pics and map!
OdpowiedzUsuńCool Blog mate, link added
OdpowiedzUsuńThank you Al.
UsuńWinning draw sounds very fitting Bart! Fantastic looking game!
OdpowiedzUsuńThank you Rodger.
UsuńGreat looking game! Love the maps and pics! And a brilliant blog to boot!
OdpowiedzUsuńBest Regards
John
Thank you John.
UsuńNow off to learn some Polish :)
OdpowiedzUsuń:)
Usuń