27 października 2024

Cruel Seas: The Agent OOSplash.

Last Thursday evening at our club (SESWC Edinburgh), we played Cruel Seas. Tim prepared an intriguing scenario in which one side aimed to take over an agent from a neutral freighter while the other sought to prevent it. Before the game, we rolled a die, which determined that the British would attempt to capture the agent while the Germans would work to stop them.


SCENARIO: Tim Chant
UMPIRING
Tim Chant
SCENERYSESWC
FIGURES & MODELSTim Chant


1. Forces.


ROYAL NAVY
(Alasdair,  Mike, Peter, Tim)

2 x FAIRMILE D. 
2 x VOSPER MTB I
2 x VOSPER MTB II


KRIEGSMARINE
(Andy, Bartek, David, Michael)

3 x S-38 class
3 x S-100 class


2. The Game.

We planned to stay relatively close to the freighter and follow its course, concentrating most of our forces on its starboard side. Our mission was to engage the heavier British boats, while Michael would act as a distraction, drawing the fire from the lighter boats toward himself. The British chose to split their forces, sending part of them around the island to tackle the Germans with the remainder.


Finally, a fight broke out. Peter's and Mike's boats opened fire on Michael, who returned the favour. Soon, the rest of the German boats joined in. Both sides were taking damage. However, our biggest concern was the two Fairmile boats—one led by Peter and the other by Tim. We decided to concentrate our fire primarily on these boats, and it began to prove effective. There was a collision between Tim's and Michael's boats, resulting in severe damage to both. Michael managed to survive, but Tim came under fire from Andy and David's boats. Eventually, one fewer British boat was left in the battle.


Soon, Peter's Fairmile was also destroyed, but the Germans paid for it by sinking one of the S-38 class boats. Alasdair then joined the action with his plywood boats and began carrying out the mission. To take over the agent from the freighter, it was necessary to sail alongside it at the same speed for a turn. Alasdair managed to do this, and just when the British were certain of victory, the Germans emerged from behind the freighter. Most of the salvos were inaccurate, but the last salvo from my 37mm gun sank the boat with the agent. In this way, the Germans proved to be the winners of this encounter.


3. Links.

SESWC:

https://www.facebook.com/Seswc.co.uk/posts/954613603362638

FLICKR:

https://www.flickr.com/photos/asienieboje/albums/72177720321510467

24 października 2024

The Bridge. 1813.

Last Thursday, we played an extensive Napoleonic game using the Black Powder rules. Michael and I agreed to an 800-point game. I could use my new third battalions for the first time, which made a significant difference. Michael fielded the Austrian army, while I commanded my Polish forces. The game was played with six participants.


SCENARIO: Bartek Żynda
UMPIRING: Michael Schneider, Bartek Żynda
SCENERYMichael Schneider, Bartek Żynda, SESWC
FIGURES & MODELSMichael Schneider, Bartek Żynda


1. Forces.


POLAND
(Alasdair, Bartek, Campbell)

CinC (9)

1 x Horse Gun (Veteran)
1 x Field Gun (Veteran)
1 x Heavy Gun (Veteran)

1st Infantry Brigade

Brigade General (8)

5 x Infantry Battalion
1 x Regimental Gun Battery

2nd Infantry Brigade

Brigade General (8)

5 x Infantry Battalion
1 x Regimental Gun Battery

Cavalry Brigade

Brigade General

1 x Ułan Regiment (Veteran)
2 x Ułan Regiment


AUSTRIA
(Bart, Michael, Tim)

CinC (8)

1st Infantry Brigade

Brigade General (8)

2 x Light Infantry (Large)
1 x Regimental Gun Battery

2nd Infantry Brigade

Brigade General (8)

2 x Grenadiers (Large)
1 x Regimental Gun Battery

3rd Infantry Brigade

Brigade General (8)

2 x Hungarian Grenadiers (Large)
1 x Regimental Gun Battery

1st Cavalry Brigade

Brigade General (8)

1 x Dragoons (Large)
4 x Hussar Abtailung
1 x Horse Gun

2nd Cavalry Brigade

Brigade General (8)

1 x Cuirassiers (Large)
4 x Dragoon Abtailung 
1 x Horse Gun


2. The game.

I aimed to create a symmetrical battlefield. At the centre was a bridge, the main objective of the game. The Austrians occupied one side, while the Poles were stationed on the other. Alasdair commanded an infantry brigade on our right flank, facing heavy Austrian cavalry and potential Hungarian grenadiers led by Tim. To give him a fighting chance against such a formidable opponent, he was provided with Field and Heavy guns from the commander-in-chief. Alasdair's mission was to reach the river line, halt the Austrian assaults on this flank, and also protect me from being flanked. In the middle, I stood with my infantry brigade and kept our commander close by. My task was to capture the bridge before Michael could take control of it. On our left flank, our cavalry was tasked with halting and defeating the light Austrian cavalry commanded by Bart. Their goal was to flank the Austrian troops, diverting them away from the main objective of the game.


Our units advanced, and soon our infantry reached the river line. However, we encountered problems. Alasdair blundered and mistakenly moved the regimental guns too far forward, placing them right in front of our lines. They became easy targets for the Austrian cavalry, who quickly decimated them. Meanwhile, my attack on the Austrians across the river ended in disaster, destroying two of my battalions. Fortunately, I still had three more available. Our cavalry met a similar fate; their first charge failed. The situation looked very grim for us.


A battle of attrition began. Tim moved his cavalry forward against Alasdair and even managed to charge the square, but the Poles withstood this assault. Unfortunately, the Austrians positioned their guns and unleashed salvos that destroyed two more infantry battalions. In the centre, my troops were stuck on one side of the river and could do nothing for now. Campbell did his best, but his Uhlans were successfully repelling the Austrian light cavalry, which was led brilliantly by Bart. At this point, I was about to announce a retreat when something incomprehensible happened...


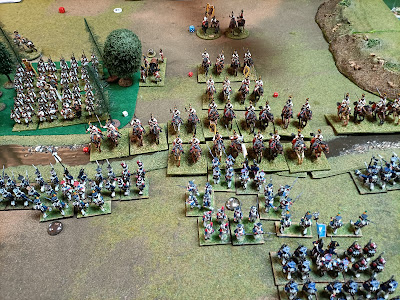
Tim, sensing easy prey, charged at the battered Polish battalions with his grenadiers. However, Alasdair not only persevered but also triumphed in the hand-to-hand combat, forcing the Austrians to test their morale. What happened next exceeded my wildest expectations: every Austrian unit failed this test, creating a significant gap in their lines. Campbell also managed to destroy one of the hussar units, but he was still far from breaking through on our left flank. At that point, I decided to go all in. My least damaged unit, which had been stationed in the village on our side of the river, charged the disorganized group of Austrian grenadiers. Initially, the first order was ignored, but then the intervention of the commander-in-chief proved invaluable. The Poles charged across the river and defeated the Austrians in hand-to-hand combat! This action concluded the entire game, resulting in an undisputed Polish victory.


3. Links.

MICHAEL:

https://meneken.blogspot.com/2024/10/1813-long-bridge-ictional-napoleonic.html

SESWC:

https://www.facebook.com/Seswc.co.uk/posts/951846576972674

FLICKR:

https://www.flickr.com/photos/asienieboje/albums/72177720321478529

14 października 2024

Galleys & Galleons.

Before my holiday, Campbell revealed his long-hidden project: an early galleons and galleys set called Galleons & Galleys. After my return, I asked him to allow me to familiarize myself with the rules. Last Thursday, we managed to play two games. The rules turned out to be very easy to learn and use. Best of all, they are also very adaptable, allowing you to change a rule to better suit historical realities, for example, if it doesn't suit you. In a word, only advantages.


SCENARIO: Campbell Hardie
UMPIRING
Campbell Hardie
SCENERYSESWC
FIGURES & MODELSCampbell Hardie

1. Catholic League vs British League.

1.1. Forces.


CATHOLIC LEAGUE
(Alasdair, Bartek)

SAN MARTIN (Spain)
SAN INES (Spain)
SAO FILIPE (Portugal)
ZUNIGA (Venice)


BRITISH LEAGUE
(Campbell, David, Michael)

ARK ROYAL (England)
REVENGE (England)
HODGE (Scotland)
GREAT HARRY (Scotland)


1.2. The game.

In our first game, two leagues clashed: the Catholic and the British. Alasdair commanded Spanish ships, and I commanded Portuguese and Venetian ships. On the other side, Campbell commanded Scottish ships, and David and Michael commanded English ships. Right from the start, my ships got too far ahead and, despite my best efforts, they were unable to return to the battlefield before it was decided. They only fired a few inaccurate salvos and then headed off into the unknown. Alasdair, who was lagging behind, found himself in the middle of the fight. Scottish ships attacked him. The Spanish ships, better armed and better equipped, were no match for the Scots. There was an artillery fight, then a ramming, and finally a boarding. The Spanish were superior in all three elements. Eventually, one of the Scottish ships withdrew mangled and the other was captured by the Spanish. Then the English joined the fight. They fired on the Spanish ship, which started to burn. The attempt to extinguish the fire ended in failure and the Spaniard was blown up, while the captured Scottish ship caught fire and also sank. In this situation, the remaining Spanish ship withdrew from the fight. It was a draw.


2. Galleons against the galleys.

2.1. Forces.


GALLEONS
(Alasdair, Bartek)

ARK ROYAL (England)
REVANGE (Endland)


GALLEYS
(Campbell, David, Michael)

CAPITANA (Spain)
SAN LORENZO (Spain)
ZUNIGA (Venetia)


2.2. The game.

In our second game, the galleons clashed with the galleys. Once again, Campbell moved his ship forward strongly and once again, his ship was heavily fired upon by Alasdair's ship, causing it to sink. Just when we were expecting an easy victory, a series of unfortunate events occurred. First, my ship unsuccessfully fired upon Michael's ship, which then rammed my ship, causing significant damage. In a short hand-to-hand fight, Michael's crew captured my ship. Alasdair, who was performing a long return manoeuvre, couldn't support me in the fight. When he returned, he managed to fire upon the captured ship and sink it, but then he withdrew from the fight again. It ended in another draw.


3. Links

SESWC (Campbell):

https://www.facebook.com/Seswc.co.uk/posts/944036311087034

FLICKR:

https://www.flickr.com/photos/asienieboje/albums/72177720321219859