czwartek, 27 listopada 2014

Judge Dredd; Berlin - update. Sędzia Dredd; Berlin uzupełnienie.

This week there wasn't any game at Hugh's and in the club we had our AGM. Surprisingly the AGM finished very quickly and we had time for very good board game called Judge Dredd. In this game you play one of the judges and tried to arrest as much criminals (you are getting points for criminal and their crime) as you can and of course other judges doing everything to stop you and get the victory to themselves. In our four players game, Matt [the Greek] was victorious with 62 points collected I took the second place with 42 points and Paul [the Greek] and Derek Hodge took the third and fourth places. I was really enjoyed this game, however I'm not very familiar with Dredd's universe.
W tym tygodniu gra u Hugha została odwołana a w klubie mieliśmy doroczne spotkanie organizacyjne. Zaskakująco spotkanie skończyło sie bardzo szybko i mieliśmy czas na rozegranie planszówki zatytułowanej Sedzia Dredd. W tej grze wciela się w jednego z sędziów, których zadaniem jest pojmanie jak największej liczby kryminalistów (otrzymuje się punkty za każdego kryminalistę i popełnione przez niego przestępstwo), z kolei inni sędziowie działają przeciwko tobie i sami starają się osiągnąć zwycięstwo. W naszej czteroosobowej grze zwycięstwo odniósł Matt [Grek], zdobywając 62 punkty, drugi byłem ja, zdobywając 42 punkty a dalsze miejsca zajęli Paul [Grek] i Derek Hodge. Bardzo mi się ta gra podobała pomimo faktu, że uniwersum Dredd'a jest mi stosunkowo obce.

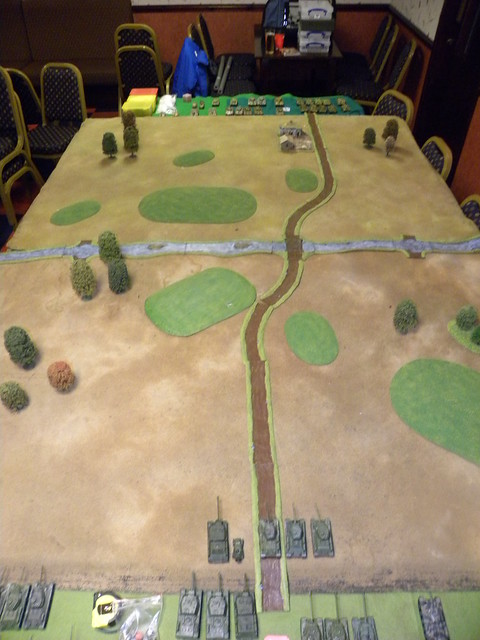
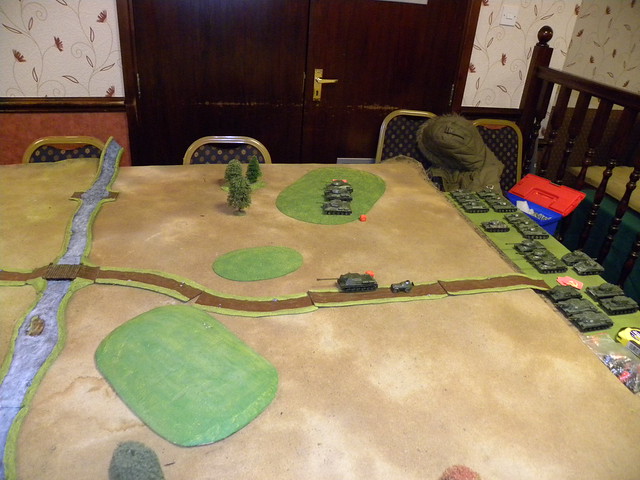
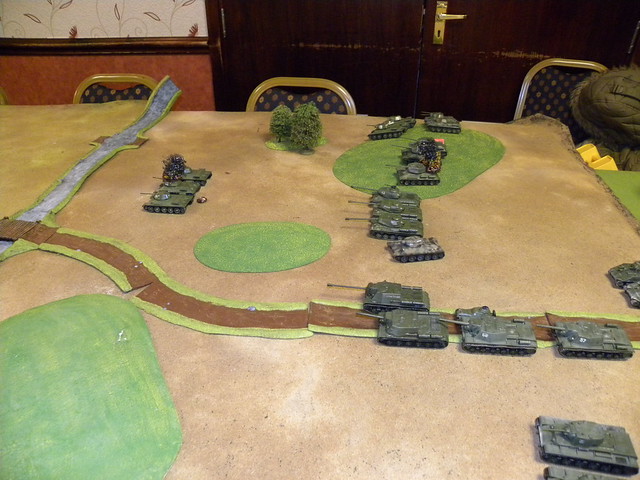
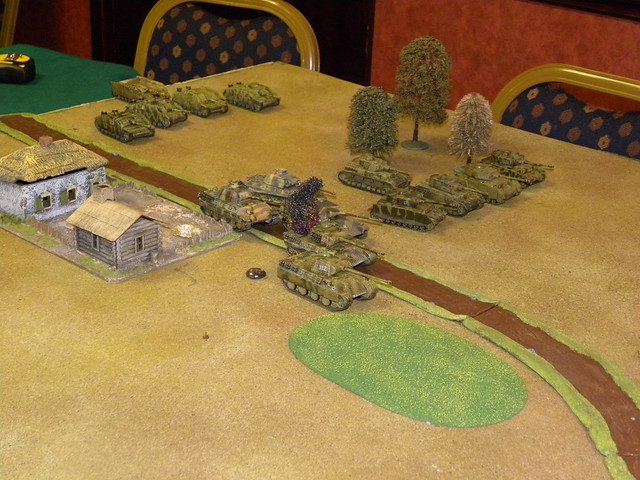
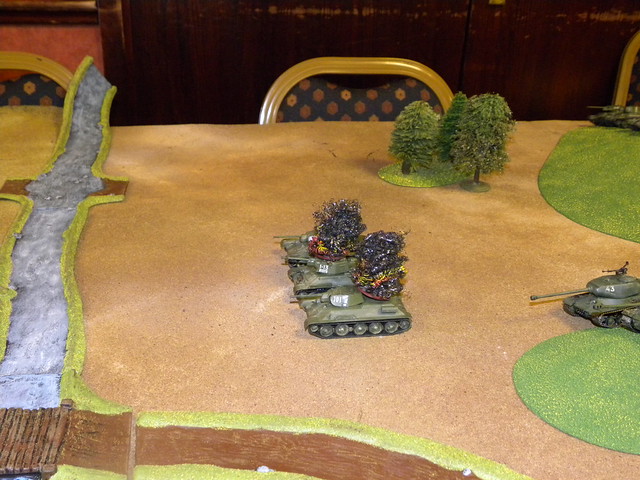
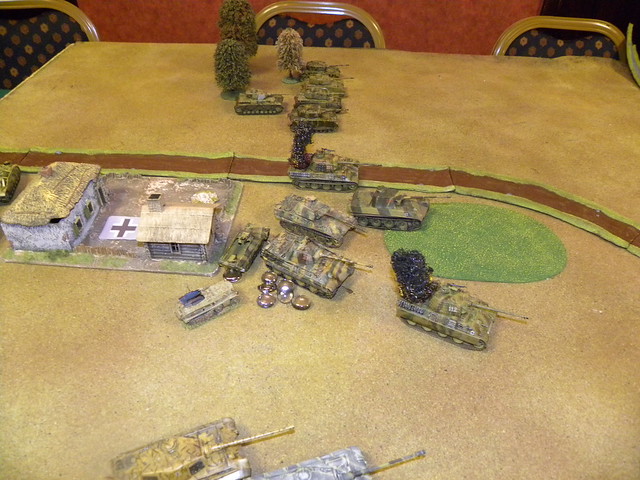
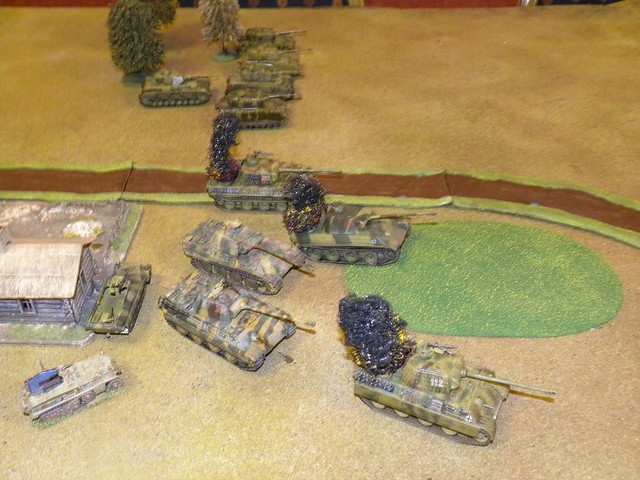
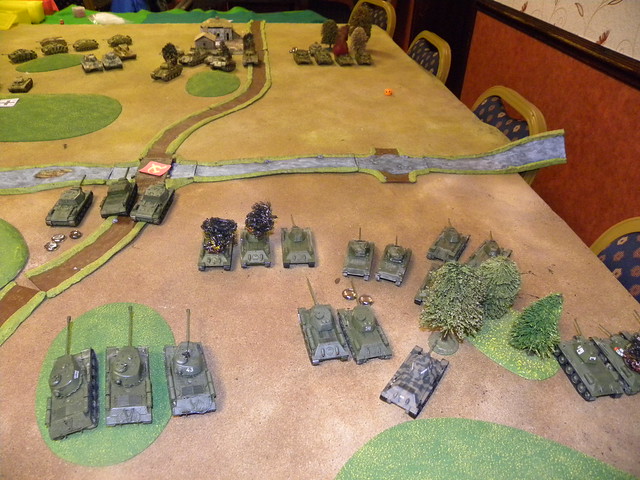
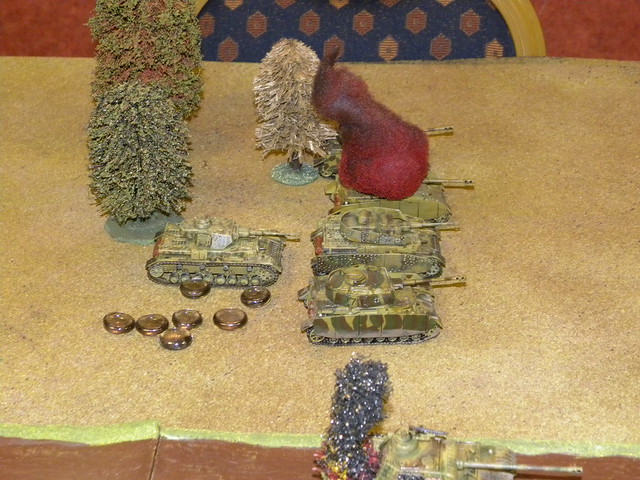
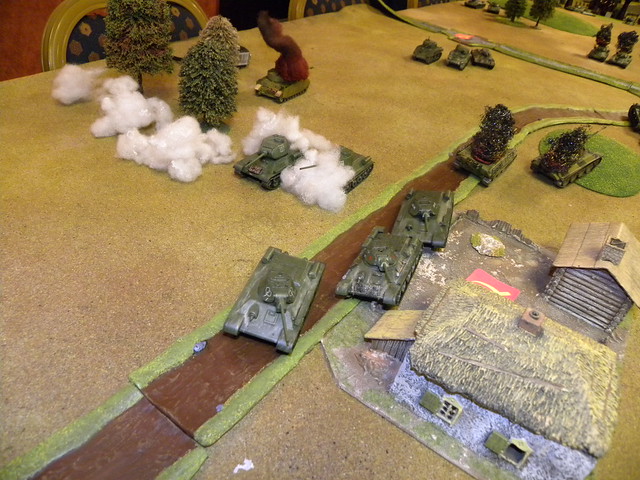
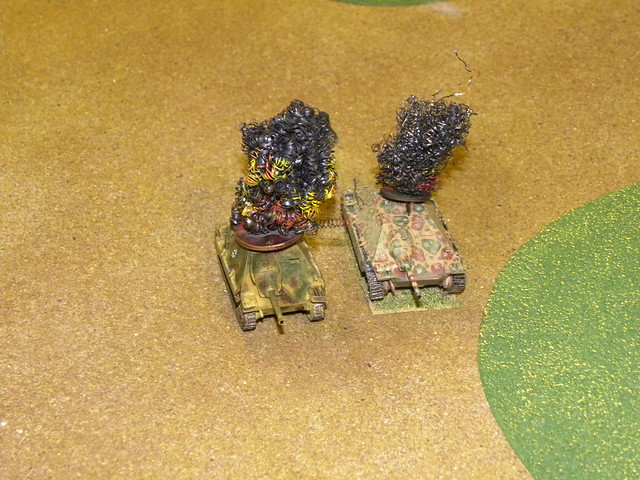
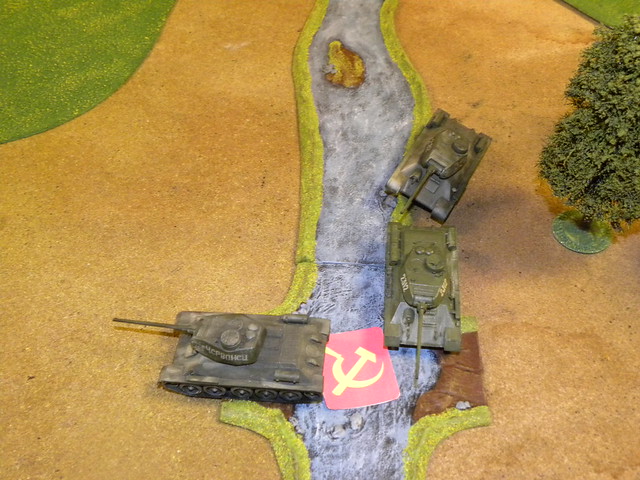
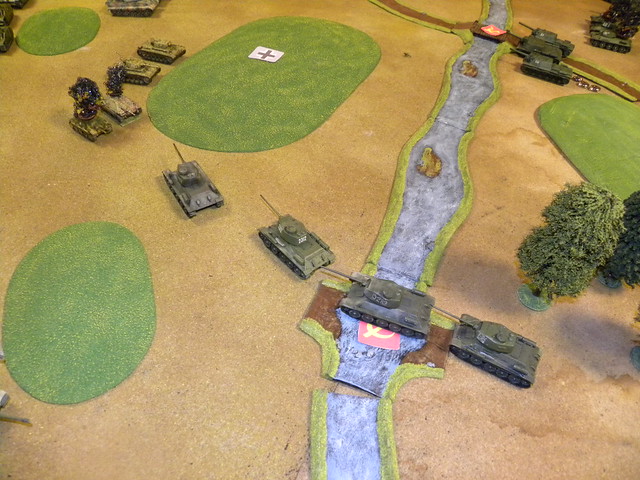
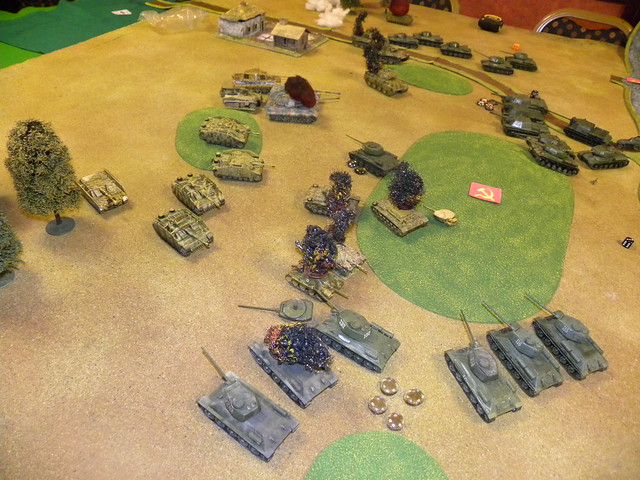
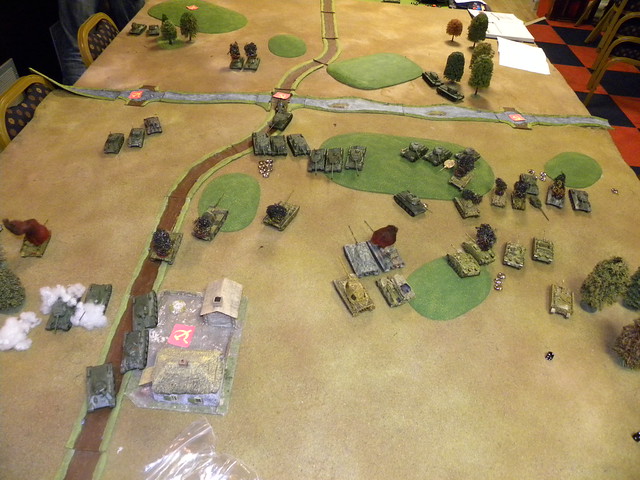
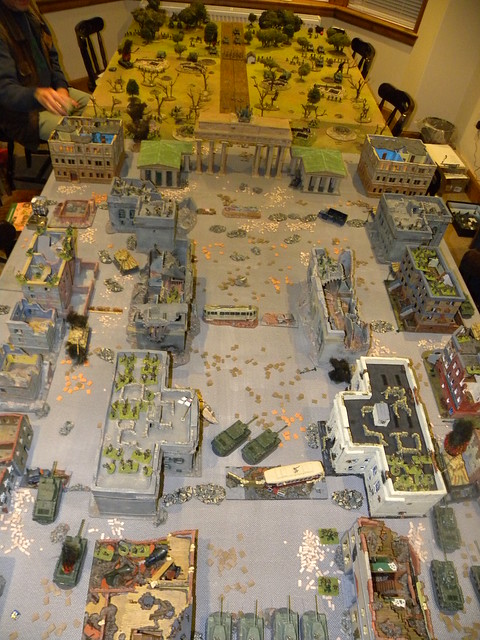
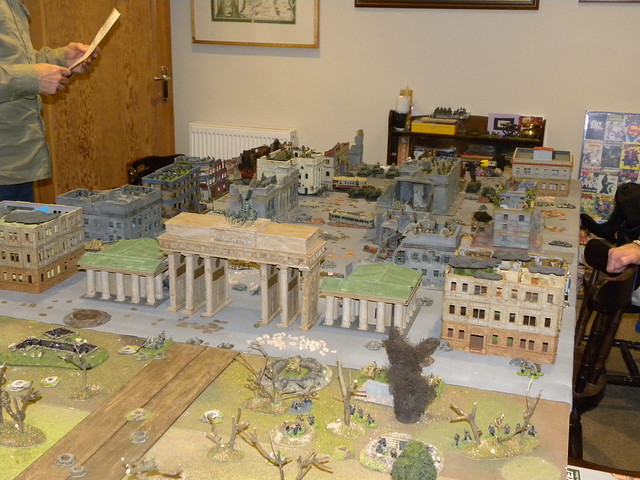
The second think is promised you OdB from our last game: Berlin 1945 (previous post). Here it is:
Druga sprawa jest obiecany OdB naszej ostatniej gry: Berlin 1945 (patrz poprzedni post). Oto on:

Soviet Order of Battle - all regular

Elements of 3rd Shock Army Unter Den Linden
(Hugh Wilson, Bartek Żynda)
594th Rifle Regt
AT Coy: 2 45mm ATG ea 3 figures
AT Coy: 76mm FG + 3 crew
Gun Coy: 76mm IG + 3 figures
Eng Coy: 8 figures including Fl Thr

1st Rifle Btn:
HQ: CO + 4 figures including ATR
Rifle Coy: 8 figures
SMG Coy: 8 figures
MG Coy: MMG, 81mm Mtr, 6 figures

2nd Rifle Btn as 1st
3rd Rifle Btn as 1st but no mortar

Attached


Tank Regiment 4 T34/85
SU Regt 4 ISU152
SU Regt 4 ISU122
SU Regt SU100, 2 SU85
GBT Tank Regt 3 IS2
GBT Tank Regt 3 IS2

Off table
How Btn: 3 122mm How with on table FO

Elements of 5th Shock Army Tiergarten
(Bill Gilchrist)

694th Rifle Regt
AT Coy: 2 45mm ATG ea 3 figures
AT Coy: 76mm FG + 3 crew
Gun Coy: 76mm IG + 3 figures
Eng Coy: 8 figures including Fl Thr

1st Rifle Btn:
HQ: CO + 4 figures including ATR
Rifle Coy: 8 figures
SMG Coy: 8 figures
MG Coy: MMG, 81mm Mtr, 6 figures

2nd Rifle Btn as 1st
3rd Rifle Btn as 1st but no mortar

Attached
Tank Regiment 4 T34/85
SU Regt 3 ISU152
SU Regt 2 SU122
SU Regt 2 SU76
GBT Tank Regt 2 IS2
GM Btn 2 Katyusha with FOO


Off table
Mortar Btn: 3 120mm Mtr with on table FO

Support 1

1st Gds Para Btn (Vet)
HQ: CO + 4 figures including Fl Thr
Rifle Coy: 8 figures
MG Coy: MMG, 81mm Mtr, 6 figures

31st Gds SMG Scout Btn (Vet) (not used)
HQ: CO + 4 smg figures
Rifle Coy: 6 smg figures

32nd Gds SMG Scout Btn (Vet) (not used)
HQ: CO + 4 smg figures
Rifle Coy: 6 smg figures

Polish Rifle Btn (not used)
HQ: CO + 4 figures including ATR
Rifle Coy: 8 figures
MG Coy: MMG, 81mm Mtr, 6 figures

German Order of Battle

PARISER PLATZ
(Tim Watson, Ray Neal)

101st Panzer Grenadier Btn regular test @ 20
HQ – CO + 5 figs inc 1 x Panzerschreck
Coy 1 – 8 figs inc Panzerfaust
Coy 2 – 8 figs inc Panzerfaust
Coy 3 – 8 figs inc Panzerfaust
MG Coy –mmg, 81mm mortar, 6 figs
Supp Coy – 75mm PAK, 75mm IG, 6 figs

102nd Panzer Grenadier Btn regular test @ 20
As 101st

CJ Nordland Pz Gren Btn regular test @ 20
HQ – CO + 4 figs inc 1 x Panzerschreck
Coy 1 – 8 figs inc Panzerfaust
Coy 2 – 8 figs inc Panzerfaust
Coy 3 – 8 figs inc Panzerfaust
MG Coy –mmg, 81mm mortar, 75mm PAK, 9 figs

CJ Munchenberg Pz Gren Btn regular test @ 16
HQ – CO + 4 figs inc 1 x Panzerschreck
Coy 1 – 8 figs inc Panzerfaust
Coy 2 – 8 figs inc Panzerfaust
Coy 3 – 8 figs inc Panzerfaust
MG Coy –mmg, 3 figs

CJ Volksturm Btn Poor test @ 15
HQ – CO + 4 figs inc 1 x Panzerschreck
Coy 1 – 7 figs inc Panzerfaust
Coy 2 – 7 figs inc Panzerfaust
Coy 3 – 7 figs inc Panzerfaust
MG Coy –mmg, 3 figs

2 Indep coys of Volksturm
Ea 6 Figs incl Panzerfaust

PzJg Coy: BIV JgPz

TIERGARTEN
(Colin Jack)

CJ Estonian Pz Gren Btn regular test @ 20
HQ – CO + 4 figs inc 1 x Panzerschreck
Coy 1 – 8 figs inc Panzerfaust
Coy 2 – 8 figs inc Panzerfaust
Coy 3 – 8 figs inc Panzerfaust
MG Coy:mmg, 81mm mortar, 120mm Mtr, 9 figs

301st Panzer Grenadier Btn regular test @ 19
HQ – CO + 5 figs inc 1 x Panzerschreck
Coy 1 – 8 figs inc Panzerfaust
Coy 2 – 8 figs inc Panzerfaust
Coy 3 – 8 figs inc Panzerfaust
MG Coy –75mm PAK, 3 figs

CJ Volksturm Btn Poor test @ 15
HQ – CO + 4 figs inc 1 x Panzerschreck
Coy 1 – 7 figs inc Panzerfaust
Coy 2 – 7 figs inc Panzerfaust
Coy 3 – 7 figs inc Panzerfaust
MG Coy –mmg, 3 figs

CJ Indep Naval coy – 10 figs incl Panzerfaust


Berlin Support

11th 'Herman von Salza' Pz Battalion
Coy: 3 Panther
Coy: 3 Panther

503rd Schw Pz Btn
Coy: 4 Tiger I

Artillery Btn
2 x 105mm Howitzer ea 4 figs
2 OP teams

AA Div
Coy: 20mm AA, 2 figs
Coy: Qd 20mm AA, 3 figs
Coy: 88mm AA, 4 Figs

AT Btn
88mm PAK43, 4 crew

Pz Coy: Maus

niedziela, 23 listopada 2014

Bolt Action - Tank War.

The idea of that game was born after the "Fury" movie. We were so delighted with the movie (if you not taking this movie to serious, it is a really great), so I had the idea of using all my tanks previously never been used on the table before. I created two lists with tanks only (who need an infantry or guns - waste of time) and finally got 7521 pts German versus 7520 pts Soviet.
Pomysł tej gry narodził się po seansie "Fury". Byliśmy tak zauroczeni filmem (jeśli nie bierzesz tego filmy zbyt dosłownie, to okazuje się on naprawdę dobrym filmem), że w mojej głowie powstała idea użycia czołgów, które do tej pory nie miały szansy znaleźć się na stole. Stworzyłem dwie listy zawierające tylko czołgi (kto by się bawił w piechotę albo działa) i w końcu skończyłem na 7521 pkt dla Niemców i 7520 dla Sowietów.

SCENARIO/SCENARIUSZ: Bartek Żynda (with the use of "Tank Wars" supplement)
SCENERY/SCENERIA: SESWC
MODELS/ MODELE: Bartek Żynda

1. Forces. Siły.

GERMANS/NIEMCY
(Campbell Hardie)

HQ: SdKfz 250/3, SdKfz 251/9 (Officer +3)
1 Zug: 3 x PzKpfw VI Ausf. B Königstiger
2 Zug: 5 x PzKpfw V Panther
3 Zug: 5 x PzKpfw IV
4 Zug: 5 x StuG III
5 Zug: 2 x Jagdpanther
6 Zug: 2 x Jagdpanzer 38(t)
7 Zug: 2 x PzKpfw III

SOVIETS/SOWIECI
(Bartek Żynda)

HQ: BA-64, ISU-122 (Officer +3)

1st Tank Regiment:
RHQ: T-34/85 (Officer +2)
1st Platoon: 3 x T34/85
2nd Platoon: 3 x T34/85
3rd Platoon: 3 x T34/85

2nd Tank Regiment:
RHQ: T-34/76 (Officer +2)
1st Platoon: 3 x T34/76
2nd Platoon: 3 x T34/76
3rd Platoon: 3 x T34/76

Heavy Tank Regiment:
1st Platoon: 3 x IS-2
2nd Platoon: 2 x KV-1

ISU Platoon: ISU 152, 2 x SU - 152

Sherman Platoon: 2 x M4A2 Sherman

2. Scenario. Scenariusz.

I have used the scenario from the "Tank War" supplement, however I modificated it a little. Because of the number of the tanks the order dice activated the whole platoon rather then the single tank, we used the tea time dices to speed up the game. In our game we had six objectives: 3 river crossings, 2 large hills and the farm, every get the objective if any of the tanks close to it at 6 inches.
Użyłem scenariusza z dodatku "Tank War", jednakże trochę go zmodyfikowałem. Ze względu na dużą liczbę czołgów kość rozkazu aktywowała cały pluton zamiast pojedynczego czołgu oraz użyliśmy kości tea time, by przyspieszyć grę. W naszej grze mieliśmy sześć celów: 3 przeprawy przez rzekę, 2 duże wzgórza i farmę, cel opanowywało się gdy jakikolwiek czołg zbliżał się doń na odległość 6 cali.

3. The Game. Gra.

During the first turn Campbell was able to put all his tanks on the table compare to my two platoons. The first wave was determined by the dice roll, he got 8 on D8, I had 2 on D12, so the game started not to good for Soviets, however Campbell haven't use his supremacy and there was no fights during that turn. In the next turn I managed to bring more tanks and forces finally become equal. During the third turn we had first loses. I lost two T-34/76 and Campbell one of his Panthers.
W czasie pierwszej tury Campbellowi udało się wprowadzić na stół wszystkie swoje czołgi, mi tylko dwa plutony. Pierwsza fala była określana przez rzut kością, Campbell rzucił 8 na K8, ja z kolei tylko 2 na K12, tak więc gra nie zaczęła się dobrze dla Sowietów, jednak Campbell nie wykorzystał swojej początkowej przewagi i już w następnej turze na stole pojawiło się więcej sowieckich czołgów i siły się wyrównały. W trzeciej turze ponieśliśmy pierwsze straty, ja straciłem dwa T-34/76 a Campbell pierwszą Panterę.

Fourth turn started for me very badly, as lost of another T-34/76 finished in morale test with one of my platoons. I failed and lost first platoon. After this I lost another T-34/76 and another platoon morale test and another failure - all of this for the price of one Pnather. This was very badly, so I decided that there is nothing to lose and push all my tanks forward.
Czwarta tura zaczęła się dla mnie źle i utrata kolejnego T-34/76 spowodowała test morale jednego z plutonów. Test został niezaliczony i straciłem pierwszy pluton. Po tym straciłem kolejny T-34/76 i znów test i znów porażka - wszystko to za cenę jednej Pantery. Sytuacja stawała się poważna, więc zdecydowałem się, że nie ma już nic do stracenia i pchnąłem moje wszystkie czołgi do przodu.

The whole game divided into two clashes. One at the bridge and the second at the lower ford. At the bridge my ISU and SUs finally get the position to fire. Their guns are just amazing and the name "the tin opener" is fully deserved. They smashed one of the Panthers and suppressed rest of them with a large number of pins. Campbell managed to rally them, but with next turn I pinned them enough to eliminate them from the game. Next fire went on Pz IV with the same result. This opened the upper ford for my tanks. Now unstoppable T-34s crossed the river and took the farm.
Cała gra podzieliła się na dwa pojedynki, jeden przy moście i drugi przy dolnym brodzie. Przy moście udało mi sie ustawić w pozycji strzeleckiej moje ISU i SU. Ich działa w pełni zasługują na miano "otwieraczy do puszek". Zmasakrowały jedną z Panter i mocno przyparły do ziemi resztę czołgów dużą liczbą pinów. Campbelowi co prawda udało się je przywrócić do porządku, jednak w następnej turze znów przygniotłem je ogniem i zadałem tyle pinów, że czołgi w końcu zostały wyeliminowane z gry. Cały proces powtórzyłem przeciwko Pz IV osiągając ten sam rezultat. To otworzyło górny bród dla moich czołgów przez który przeprawiły się niepowstrzymane T-34, które ostatecznie zajęły farmę.

On the lower ford my T-34/85s have been stopped by Hetzers and Jagdpanthers. The fight was quite long, however the German tanks missed every time they shoot opposite to  Soviet tanks, which dice were much more accurate. They eliminate the German guns and Soviet crossed the river. After this they eliminated Pz III and took the part in last fight against King Tigers and StuGs. This was won too by Soviets, as same as the whole game.
Nad dolnym brodem moje T-34/85 zostały zatrzymane przez Hetzery i Jagdpanthery. Walka była dość długa, jednak niemieckie czołgi pudłowały za każdym razem w przeciwieństwie do sowieckich. W końcu wszystkie działa zostały wyeliminowane i tanki przekroczyły rzekę. Po tym jeszcze wyeliminowały dwa Pz III i włączyły się do ostatniej walki przeciwko Tygrysom Królewskim i StuGom. Ta walka została również wygrana przez Sowietów, jak i cała gra.

4. Summary. Podsumowanie.

The game was very pleasant, however I'm not happy with the supplement. The structure of the book in my opinion is not sufficient to satisfy the wargamers. From one side is quite a lot informations about the tank platoons structures and the use of tanks in the 2WW, some new statistic for some new vehicles, as same for some tank aces - this is all good for beginners, but not for the more experienced players, who can create this statistics by themselves after very basic research. The tank talk dictionary I found as totally misplaced. In summary this book is good for the beginners, however I recommend to look for the informations about the tank warfare in the proper sources (especially in your library), for the rest of the wargamers, the decision is yours. The book itself is a gadget but not very necessary to play Bolt Action.
Gra sama w sobie była bardzo przyjemna, jednak niezbyt jestem zadowolony z dodatku. Struktura książki w mojej opinii nie jest w stanie zaspokoić oczekiwań graczy wargamingowych. Z jednej strony zawiera dość dużo informacji na temat struktury plutonów pancernych i użycia czołgów w czasie II Wojny Światowej, kilka nowych statystyk pojazdów jak i asów pancernych - to jest dobre dla początkujących, lecz niezbyt dla bardziej doświadczonych graczy, którzy tego typu poszukiwania mogą zdobyć te informacje dokonując bardzo szybkiego badania w źródłach. Słownik zawierający zwroty używane przez czołgistów uważam za totalną pomyłkę. W podsumowaniu, ta książka jest dobrą pozycją dla początkujących, jednakże polecam im poszukanie informacji w bardziej poważnych publikacjach (najlepiej w waszych bibliotekach), co do reszty wargamerów to decyzja należy do Was. Książka jest tylko gadżetem, nie koniecznie potrzebnym do grania w Bolt Action.

And the last information, you've just read the 300th post on my blog!
I ostatnia informacja, właśnie przeczytaliście 300 post na moim blogu!

Gallery from the game on my Flickr:
Galeria z gry na moim Flickr:

sobota, 22 listopada 2014

Berlin 1945.

Because some of us are no more able to play on Thursdays we've moved our at Hugh's games on Wednesdays, and thanks that some of us (including myself) from now on have possibility of two games during the week, on Wednesday at Hugh's and on Thursday in the club. Today's described game was played on last Wednesday and it was the second part of the large game: Berlin 1945 with Rapid Fire rules.
Ponieważ część z nas nie jest już w stanie rozgrywać dalszych gier w czwartki, nasze gry u Hugha przenieśliśmy na środy i w ten sposób część z nas (w tym i ja) ma możliwość grania dwa razy w tygodniu, w środy u Hugha i w czwartki w klubie. Dzisiejszy opis to gra rozegrana w ostatnią środę i była to duża gra: Berlin 1945, z użyciem zasad Rapid Fire.

SCENARIO/SCENARIUSZ: Bill Gilchrist
SCENERY/SCENERIA: Bill Gilchrist, Colin Jack, Hugh Wilson
MODELS&FIGURES/ MODELE I FIGURKI: Bill Gilchrist, Colin Jack

1. Forces used. Użyte siły.

The list will be updated soon.
Lista będzie wkrótce uzupełniona.

2. The game. Gra.

I wasn't able to play this game last week, so this is the situation at the moment of the start of the second game (it was 9th or 10th turn). Soviet progress has been finally stopped close to their objective, the Brandenburg Gate. In the Tiergarten the situation was similar and it looks like Soviets have been stopped there too. In that moment the Red Army received armoured support...
Nie mogłem wziąć udziału w pierwszej grze, więc to jest zastana przeze mnie sytuacja (to była dziewiąta lub dziesiąta tura gry). Postęp oddziałów sowieckich został ostatecznie zatrzymany w pobliżu celu ataku: Bramy Brandenburskiej. Od strony Tiergarten sytuacja wyglądała podobnie, Sowieci również wydawało się zostali zatrzymani. W tym właśnie momencie Armia Czerwona otrzymała wsparcie pancerne.

I received the command moving at the left side of the of the town. I had one battalion of paratroopers, three battalions of infantry (one of them was down to one company + CO) and two armoured regiments: ISU-152's and T-34/85's. The main issue was two Pantheras blocking the way for infantry. I've used mighty 152mm guns to finally eliminate the threat, but it tooks a lot of time, becouse I had very bad rolls for my AFVs that day. However I finally broke the German defend and get close to the Brandenburg Gate, where Germans had some surprise for us: the Maus tank!
Otrzymałem dowództwo nad siłami nacierającymi lewą stroną miasta. Do mojej dyspozycji miałem batalion spadochroniarzy, trzy bataliony piechoty (jeden z nich był już zredukowany do jednej kompanii i dowództwa) oraz dwa zmechanizowane regimenty: dział ISU 152 i T-34/85. Głównym problemem były dwie Panthery blokujące drogę mojej piechoty. Użyłem przeciw nim potężnych dział 152mm by w końcu je wyeliminować, jednak zajęło mi to naprawdę sporo czasu, ponieważ miałem naprawdę słabe rzuty dla moich pojazdów tego dnia. W końcu jednak udało mi się dotrzeć moimi oddziałami pod Bramę Brandenburską, ale tu czekała na nas niemiecka niespodzianka: czołg Maus!

In the same time Hugh, who lead the right hand side attack in the town and Bill, who lead the attack from the Tiergarten side got their forces close to the Gate and together we eliminated the big tank (I think that it was Hugh who finally destroyed this tank - it wasn't very easy!!!). After this Colin, Ray and Tim - the German players surrender. The Berlin has been conquered!
W tym samym czasie Hugh, który prowadził atak po prawej stronie miasta i Bill, który atakował od strony Tiergarten dotarli również w podliże Bramy i wspólnie wyeliminowaliśmy duży czołg (wydaje mi się, że to właśnie Hugh wyeliminował Mausa - co wcale nie było sprawą bardzo łatwą!!!). Po tym gracze niemieccy: Colin, Ray i Tim skapitulowali. Berlin został zdobyty!

Here you have the gallery from the game on my Flickr:
Tutaj znajdziecie galerię zdjęć z gry na moim Flickr:

niedziela, 16 listopada 2014

The siege of Khartoum. Oblężenie Chartumu.


Finally report from our Sunday game. After the defeat of the river and desert columns, Egyptian and British forces had much less troops to use and had to wisely spread them on the walls to defend the city. However they left the British battalions on the river bank and the walls were left in Egyptian hands.
W końcu czas na raport z niedzielnej gry. Po pokonaniu kolumn pustynnej i rzecznej, Egipcjanie i Brytyjczycy mieli do dyspozycji mniej oddziałów i musieli bardzo mądrze rozdysponować je na murach by obronić miasto. Jednakże brytyjskie bataliony pozostały nad brzegiem rzeki, a obronę murów pozostawiono oddziałom egipskim.

Mahdists had big seven groups of warriors, which were going to storm the city. Two of them were going to attack the main gate, two of them were going to attack city walls, another two were going to attack dried moat and finally the last one was supposed to cross the river and attack the British from behind. I was in charge of the troops attacking on the very last right.
Mahdyści do dyspozycji mieli siedem dużych grup, które miały zająć się szturmem miasta. Dwie miały szturmować główną bramę, następne dwie miały szturmować mury miasta, następne dwie miały zaatakować wyschniętą fosę a jedna miała pokonać rzekę i uderzyć Brytyjczyków od tyłu. Mi przypadło najbardziej na prawo wysunięte oddziały.

The siege begins. I had three brigades of 8 warbands each, however one of those brigades blundered and had to withdraw. It seemed like some issue but finally it wasn't and safe a lot of my troops. With two brigades left I started to storm the walls. I had not enough space for all my units to push them against the walls and one of them would have to moved toward the tower. Every section of the wall had their own mines to use against the attackers and only two of my warbands suffer the casualties. My units finally get to the walls, climb on them and after very hard battle push down the Egyptians off the walls. Then throught this gap I lead my units on the streets of the Khartoum. Just after this my units took the first tower and now nothing was able to stop me. Other troops cured with my victory repeated my actions and finally more Mahdists were in town. Finally the main gate collapsed and the Khartoum was in Mahdists hands. However some British units left the town and saved their lifes.
Oblężenie się rozpoczęło. Pod swoją komendą miałem trzy brygady po osiem oddziałów każda, jednak jedna z nich popełniła błąd i musiała się cofnąć (musiała wykonać test Blunder). Wyglądało to fatalnie, jednak okazało się zbawienne. Z dwoma brygadami rozpocząłem szturm miasta. Nie miałem zbyt dużej przestrzeni by pchnąć wszystkie brygady przeciwko murom i jedną musiałbym zaatakować wieżę. Każda sekcja murów miała do dyspozycji miny przeciwko atakującym i tak tylko dwa oddziały poniosły z tego powodu straty. Moje oddziały w końcu dopadły do murów, wspięły się na nie i po bardzo zaciętej walce zepchnęły z nich Egipcjan. Wtedy przez tak powstałą szczelinę w obronie przemieściłem moje oddziały na ulice Chartumu. Zaraz po tym moje oddziały zdobyły pierwszą z wież i teraz już nic nie było w stanie mnie zatrzymać. Inne oddziały zachęcone moim zwycięstwem wkrótce powtórzyły mój wyczyn i więcej oddziałów wlało się do miasta. W końcu padła i główna brama i Chartum znalazł się w mahdyjskich rękach. Jakkolwiek kilku brytyjskim oddziałom udało się opuścić miasto i uratować ich życia.

The game finished before the lunchtime, so we had more time for after the battle chating. I would like to say big thank you to Dave Imrie for organising the venue, to Chris Henry for working out the scenarios, to Bill Gilchrist and John Glass for umpiring the game and to rest of the gamers for preparing the figures, terrains (specially Campbell Hardie for the walls of Khartoum) and for the very great weekend. Next AB1 game is going to be at the end of February/beginning of March and it will be the Second Polish War (1812) with a use of 100+ battalions.
Gra zakończyła się przed lunchem, dzięki temu mieliśmy więcej czasu na pobitewne komentarze. W tym miejscu pragnę podziękować Dave Imrie za organizację spotkania, Chrisowi Henry za przygotowanie scenariuszy, Billowi Gilchrist i John Glass za prowadzenie gier i reszcie graczy za przygotowanie wszystkich figurek i terenów (szczególnie Campbell Hardie za mury Chartumu) i za bardzo miły wspólnie spędzony weekend. Następne spotkanie AB1 odbędzie się na przełomie lutego i marca i tym razem będzie to Druga Wojna Polska (1812) z użyciem ponad setki batalionów.

Links:
Linki:

My full gallery on the Flickr:
Moja pełna galeria na Flickr:

Bill's relation on his blog:
Relacja Billa na jego blogu:

Jack's relation on his blog:
Relacja Jack'a na jego blogu:

John's relations on his blog:
Relacje Johna na jego blogu:

środa, 12 listopada 2014

Sudan - the River Column.


Today short relation from our second Saturday game, the River Column. I wasn't play this game, however all my figures were used there. This time British had two infantry brigades, cavalry regiment, two guns and two river steamers, Mahdist forces were similar to the desert game: 27 warbands, 5 skirmishes, 5 horse cavalry and 15 camel cavalry and four guns and the dhow.
Dzisiaj krótka relacja z naszej drugiej sobotniej gry, the river Column. Osobiście nie rozgrywałem tej gry, jednak wszystkie moje figurki zostały doń użyte. Tym razem Brytyjczycy mieli dwie brygady piechoty, regiment kawalerii, dwa działa i dwa parowce rzeczne, Mahdyści dysponowali podobnymi siłami do tych z gry na pustyni: 27 warbandów piechoty, 5 oddziałów harcowników, 5 konnej kawalerii, 15 kawalerii na wielbłądach oraz cztery działa i dhow.

In this game British managed to reach the center of the table, where they met 15 warbands of the enemy. They outnumbered the British and started to push them back. Form the river Mahdists attacked the steamer with their dhow and managed to sunk it. Finally the British troops get surrounded and massacred, only one infantry battalion survived, and those mean less forces for our sunday game - the siege of Khartoum.
W tej grze Brytyjczykom udało się dojść do środka stołu, gdzie napotkali 15 warbandów wroga. Liczniejszy przeciwnik zaczął spychać Brytyjczyków do tyłu. Ze strony rzeki Mahdyści zaatakowali parowiec przy użyciu swojego dhow i w końcu udało im się go zatopić. Ostatecznie oddziały brytyjskie zostały okrążone i zmasakrowane, jedynie batalion piechoty uszedł z życiem, a to oznaczało mniej oddziałów dla naszej niedzielnej gry oblężenia Chartumu.

And some links:
Kilka linków:

My gallery on Flickr:
Moja galeria na Flickr:

Bill's relation on his blog:
Relacja Billa na jego blogu:

Jack's relation on his blog:
Relacja Jack'a na jego blogu:

TO BE CONTINUED...
CIĄG DALSZY NASTĄPI...

wtorek, 11 listopada 2014

Sudan, big game - The Desert Column. Sudan, wielka gra - The Desert Column.

During last weekend I took the part of big Sudan game. Whole game was divided into three games: two on Saturday, the relief columns, the outcome of these games would determine the forces for the Sunday siege of Khartoum game. I took the part in Desert Column game and commanded the Mahdists forces.
Podczas ostatniego weekendu wziąłem udział w wielkiej grze osadzonej w czasach Pierwszej Wojny w Sudanie.  Cała rozgrywka była podzielona na trzy gry: dwie w Sobotę dotyczące odsieczy, wynik tych dwóch gier miał rozstrzygnąć o ilości oddziałów w niedzielnej grze, oblężeniu Chartumu. Ja wziąłem udział w walkach kolumny przedzierającej się przez pustynię i byłem głównodowodzącym oddziałów Mahdystów.
The Desert Column table. Stół do gry dla odsieczy od strony pustyni.
British objective. Brytyjski cel ataku.

I had for my orders 27 warbands, 5 skirmishes, 5 horse cavalry units, 15 camel cavalry units against 6 British infantry battalions, two guns and two cavalry regiments plus some possible Egyptian troops. In our game we had three Mahdists players and two British, the Egyptian player was going to join later to our game, however he arrived when the battle was over and his troops were commanded by British players.
Pod moimi rozkazami było 27 warbandów, 5 oddziałów harcowników, 5 oddziałów kawalerii na koniach i 15 oddziałów kawalerii na wielbłądach przeciwko sześciu brytyjskim batalionom piechoty, dwóm działom i dwóm regimentom kawalerii. W naszej grze wzięło udział trzech graczy po stronie Mahdystów i dwóch po stronie Brytyjskiej, gracz egipski miał dołączyć do naszej gry później, jednak gdy przybył było już po grze i jego oddziałami dowodzili gracze brytyjscy.
British brigades. Brytyjskie brygady.

In our game I decided to attack the British as soon as posible and this tactic worked well. The use of hidden troops rule (created by Chris Henry for this game - we had several cards and some of them represented hidden units and some of them not; we were able to move this cards as the normal units, they had to be revealed 12 inches from the enemy unit) allowed us to put British in the trap. They get stopped at the beginning of the 15' table. Mahdists repeated their attack and finally managed to broke the one of the British brigades, however the second brigade survived the battle. At the end of the game arrived the Egyptian brigade (three infantry battalions, cavalry regiment and the gun), but was crushed by Mahdists attack. This game finished with Mahdists victory and not many troops were available for the Sunday game...
W naszej grze zdecydowałem się uderzyć na Brytyjczyków jak to było najszybciej możliwe. Użycie zasady ukrytych jednostek (stworzonych przez Chrisa Henry'ego dla tej gry -  mieliśmy w posiadaniu kilkanaście kart i część z nich reprezentowało ukryte oddziały, a część nie; mogliśmy te karty swobodnie poruszać tak jak normalne jednostki, gdy zbliżyły się na odległość 12 cali, musiały zostać odsłonięte) pozwoliło nam na wprowadzenie Brytyjczyków w pułapkę. Zostali oni zastopowani na początku stołu o długości 15 stóp. Mahdyści powtarzali swoje ataki i w końcu udało im się złamać jedną z brytyjskich brygad, jednakże drugiej udało się przetrwać bitwę. Pod koniec gry przybyła brygada egipska (trzy bataliony piechoty, regiment kawalerii i działo), jednak został zniszczony przez mahdyjski atak. Gra skończyła się zwycięstwem Mahdystów i zbyt wielu oddziałom nie udało się przetrwać do niedzielnej gry...
First Mahdists brigade discovered. Pierwsza odkryta brygada Mahdystów.
Hundrets of Mahdysts vs British battalions. Setki Mahdystów przeciwko brytyjskim batalionom.
The Egyptians. Egipcjanie.
The last defending line. Ostatnia linia obrony.
The victorious Mahdists. Zwycięscy Mahdyści.

TO BE CONTINUED...
CIĄG DALSZY NASTĄPI...

Full gallery from the game on my Flickr:
Pełna galeria z gry na moim Flickr:
Bill's relation on his blog:
Relacja na blogu Bill'a:
Jack's relation on his blog:
Relacja Jack'a na jego blogu: